
Hello & Welcome! I hope you are having a marvelous Monday (or whatever day you are reading this).
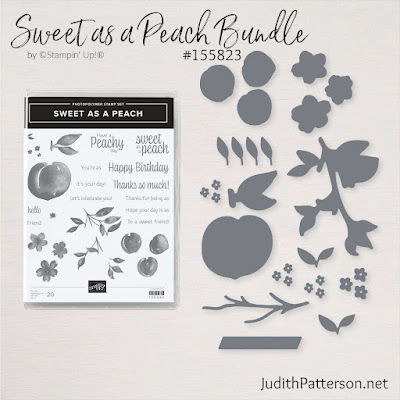
When I bought Stampin' Up!'s Sweet as a Peach Bundle, I did so because everybody I know loves peaches and we live in what has been called the Peach Capital of Texas. Back in the day, there were tons of peach farms around here, and watermelons. Personally, I've always enjoyed the watermelons more! However, it turns out peaches make lovely cards! This stamp set has beautiful images, sweet sentiments and perfect fonts. I highly recommend it if you, or anyone you know likes peaches!
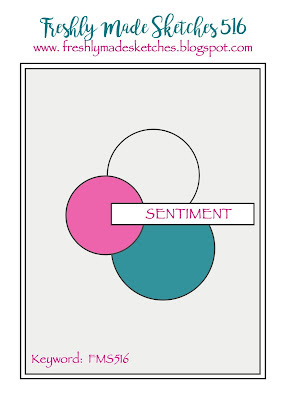
Today's card was inspired by this sketch at Freshly Made Sketches. This is the last day for this sketch challenge, but you can join the next one. Or, look through their archives for tons of sketches to inspire your next project.
MEASUREMENTS
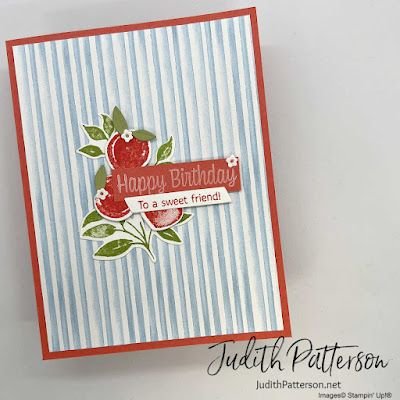
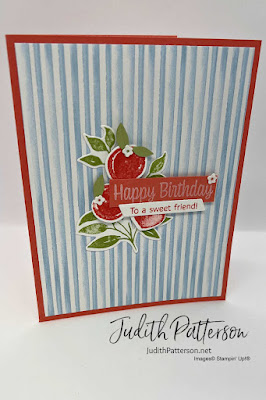
Card Base ~ Calypso Coral Cardstock ~ 8-1/2" x 5-1/2, score at 4-1/4"
Card Base ~ Calypso Coral Cardstock ~ 8-1/2" x 5-1/2, score at 4-1/4"
Layer 1 ~ You're a Peach Designer Series Paper ~ 4" x 5-1/4"
Scraps of Basic White Cardstock
Small Scrap Pear Pizzazz Cardstock
Scrap of Calypso Coral Cardstock
Inside Layer ~ Basic White Cardstock ~ 4" x 5-1/4"
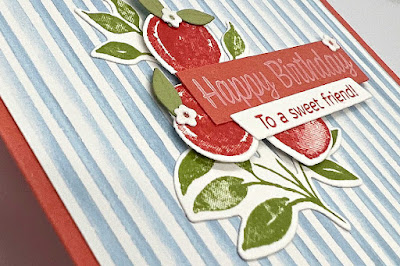
- Stamp the leaves with Pear Pizzazz Ink on the largest scrap of Basic White Cardstock
- Use Calypso Coral Ink to stamp the peaches and sentiment on another scrap of Basic White Cardstock
- Stamp 'Happy Birthday' on the scrap of Calypso Coral with Whisper White Ink
- Die cut the stamped images and 'to a sweet friend' with the coordinating dies from Peach Dies
- Also, die cut a few small Basic White flowers and little Pear Pizzazz leaves
- Trim around 'Happy Birthday' with Paper Snips
- Use Liquid Glue to adhere Layer 1 to the Card Base and the stamped leaves to Layer 1
- Attach the peaches to the stamped leaves with Stampin' Dimensionals
- Carefully add a small dab of Liquid Glue to two of the peaches, then place a flower and a leaf on each one.
- Place a bit of Liquid Glue behind the left side of 'Happy Birthday' and a Stampin' Dimensionals behind the right side. Place it over the peaches, as shown.
- Glue the top edge of 'to a sweet friend' to the bottom edge of 'Happy Birthday'
- Finish by adding a tiny flower to the 'Happy Birthday' piece
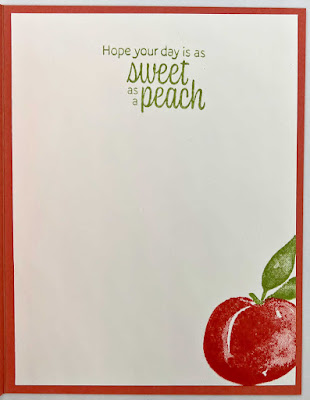
Stamp the large peach in the lower right corner of the Inside Layer with Calypso Coral ink. Then, mask the top of the peach with a Post-It note and stamp the leaves with Pear Pizzazz ink. The sentiment can be stamped with either color. Adhere the Inside Layer to the inside of your card.
I hope you were inspired by today's card, or the sketch from Freshly Made Sketches. Thanks so much for stopping by! Let me know if there's anything I can help you with. The shopping links are listed below.
Happy Stamping!
PRODUCT LIST
Please use Host Code QNB6WK39 on orders under $150. Thank you!
These pretty peaches are set off perfectly with the lovely striped blue panel! Thanks for playing along with us at FMS this week.
ReplyDeleteI love the pale blue behind the peaches! Pretty card! Glad you joined us at FMS!
ReplyDelete