Tuesday, November 30, 2021

Small Triangle Ornaments and/or Gift Box


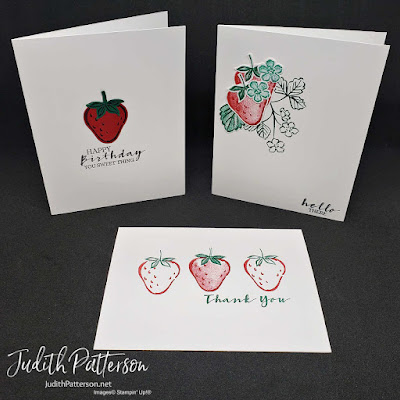
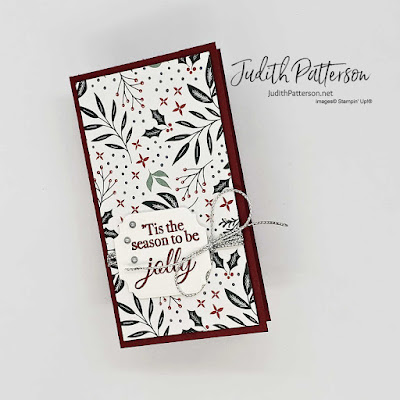
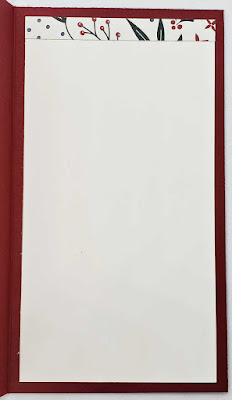
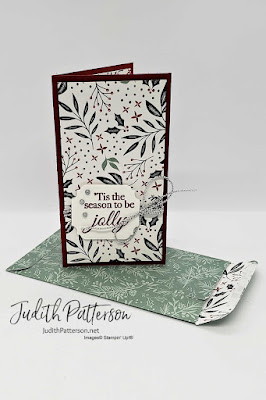
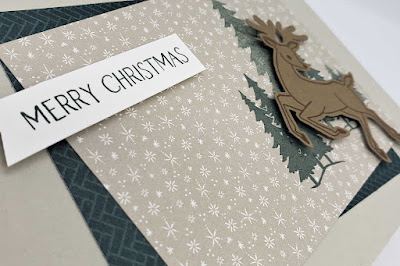
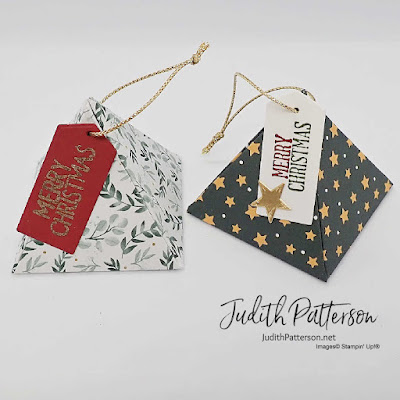
Hello Stampers & Paper Crafters!  Today's project is a fun little triangle ornament.  It's easy to make, requires only a few materials AND it can double as a little gift box.  If using it as a gift box, don't glue down the last side and tie a bow at the top, instead of the loose handing loop. 

This box is not complicated, but it's also much easier to show you than to type out the instructions.  So, I am going to give you the measurements here and include the video tutorial at the bottom of this post.
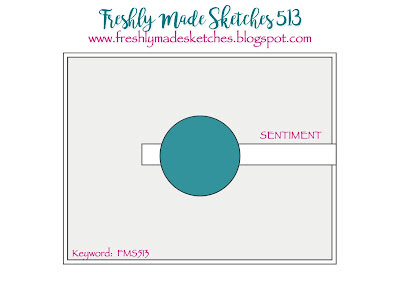
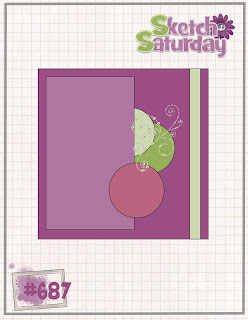

MEASUREMENTS
1 piece of 6"x6" cardstock or Designer Series Paper ~ score at 2" & 4", 
turn the DSP and score again at 2" and 4"
Make a small score mark at 3" on each side

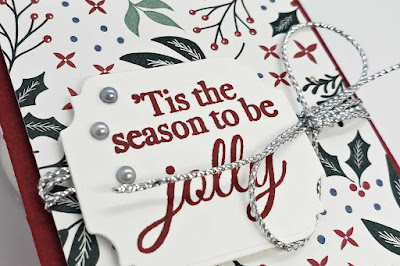
a scrap of paper for the tag
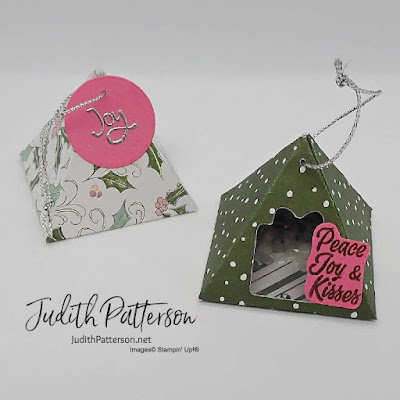
a scrap of a Window Sheet if you would like to make it a shaker ornament


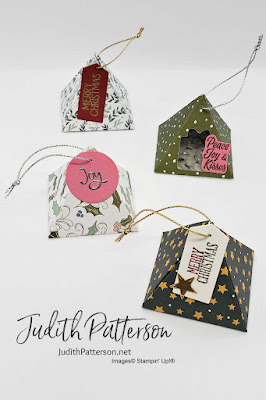
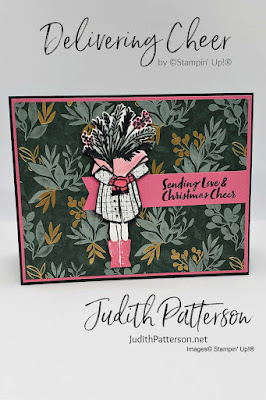
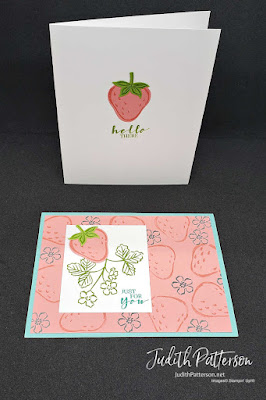
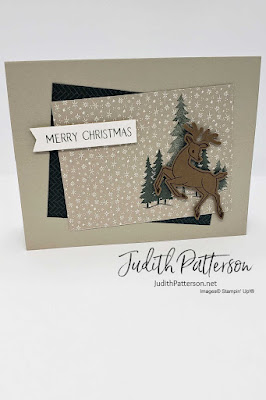
I love this ornament because it is fast, easy and so versatile!  Any DSP that doesn't have to face a specific direction can be used.

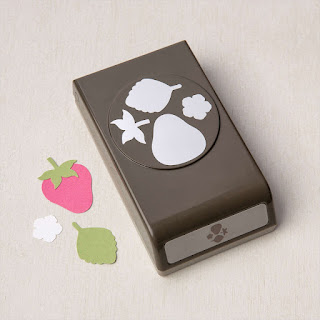
I will link the products I used for the ornament in the video at the very end of this post.  

Happy Stamping!


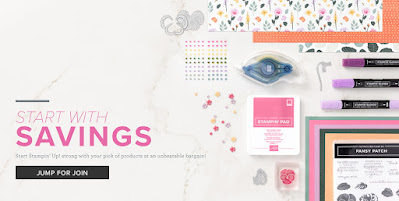
TODAY IS THE LAST DAY!!

Stampin' Up! has an amazing promotion this month!  In the USA, you can join Stampin' Up! for only $75!  What do you get for $75 +tax?  I'm so glad you asked.  You can choose up to $125 worth of Stampin' Up Merchandise as your kit contents.  That's right, YOU choose your kit!  Plus, you will get a Paper Pumpkin Kit (not the current one) and FREE shipping!  
Learn more here.  Contact me if you have any questions, I would love to help you build your kit!

PRODUCT LIST
Please use Host Code VNCZG7VK when placing orders under $150 during the month of November 2021.

Monday, November 29, 2021

Stampin' Up! Heartfelt Wishes Snowflake Christmas Card


Happy Monday!  Are you stuffed from Thanksgiving last week?  Today's card is super simple and so pretty!  It takes only minutes to make.  Heat embossing the sentiment takes the most time, and that's not too much! 

I love using specialty papers, like this fun and sparkly Ombre Specialty Paper, on cards like this one.  It only takes a small amount of this paper to make a big statement!  When I use it strategically like this, one piece of 12"x12" paper will last for several cards or projects.  That's a win-win.  :)

MEASUREMENTS
Card Base ~ Polished Pink Cardstock ~ 8-1/2" x 5-1/2", score at 4-1/4"
Layer 1 ~ Basic White Cardstock ~ 4" x 5-1/4"
Layer 2 ~ Polished Pink Cardstock ~ 3-3/4" x 5"
scraps of Ombre Specialty Paper for the snowflakes

Inside Layer ~ Basic White Cardstock ~ 4" x 5-1/4"

  • Cut out three snowflakes using Stampin' Up!'s Stitched Snowflakes Dies.  If desired, place an Adhesive Sheet behind the Ombre Specialty Paper before cutting. 
  • Heat Emboss the sentiment with Versamark and White Embossing Powder on Layer 2, as shown. 
  • Adhere the layers together with Stampin' Seal or Liquid Glue.
  • Place the smallest snowflake in the center, either with Liquid Glue or peel the back off the Adhesive Sheet, if you used that. 
  • Attach the larger snowflakes to either side of the smaller snowflake, as shown.  

Use Polished Pink Ink to stamp the sentiment on the Inside Layer.  Then, stamp the smallest snowflake in the lower right corner with Night of Navy Ink. Adhere the Inside Layer to the inside of your card with either Liquid Glue or Stampin' Seal. 


Thank you for visiting my blog today!  

Happy Stamping!

ONLY 2 DAYS LEFT! (Including today)

Stampin' Up! has an amazing promotion this month!  In the USA, you can join Stampin' Up! for only $75!  What do you get for $75 +tax?  I'm so glad you asked.  You can choose up to $125 worth of Stampin' Up Merchandise as your kit contents.  That's right, YOU choose your kit!  Plus, you will get a Paper Pumpkin Kit (not the current one) and FREE shipping!  
Learn more here.  Contact me if you have any questions, I would love to help you build your kit!

PRODUCT LIST
Please use Host Code VNCZG7VK when placing orders under $150 during the month of November 2021.


Saturday, November 27, 2021

Stampin' Up! Perfectly Plaid Christmas Card


This Christmas card can be ready in just a few minutes.  It's clean, simple and yet still uses three of my favorite techniques.  This stamp set, Perfectly Plaid by Stampin' Up!, is a classic set and one that I hope sticks around for years to come.  I've said it before, the 'Merry Christmas' stamp in this one is my favorite!

I created this set for Mix It Up Challenge #85.  I used three out of the four challenge colors and the layout!  The pictures really do not do this card justice.  (I think I need to work on my photography skills soon)


MEASUREMENTS
Card Base ~ Basic White Thick Cardstock ~ 8-1/2" x 5-1/2", score at 4-1/4"
Layer 1 ~ Basic White Cardstock ~ 4" x 5-1/4"
Basic White Cardstock ~ 3" x 4"

  • Create the background splatter on Layer 1 with a Water Painter and ink from a Misty Moonlight ink pad.  Then, repeat the process with a Night of Navy ink pad and the Water Painter. 
  • Use a Blending Brush to apply Misty Moonlight ink to half of the smallest piece of Basic White Cardstock.  Then, apply Night of Navy ink to the other half. 
  • Punch out a tree with the Pine Tree Punch from each side of the newly colored cardstock.  
  • Stamp 'Merry Christmas' with Versamark ink in the bottom right corner of Layer 1 and emboss with Silver Embossing Powder. 
  • Adhere one tree with Liquid Glue.  Then, use Mini Stampin' Dimensionals to attach the 2nd tree, as shown.  
  • Attach Layer 1 to the front of your Card Base with Stampin' Dimensionals. 

Use the Pine Tree Punch to punch another tree out of the Misty Moonlight/Night of Navy colored cardstock.  Adhere it to the bottom corner of the inside of the card with Liquid Glue.  Then, turn the card over and trim the parts tree hanging over the edge. Stamp the sentiment with Night of Navy ink, as shown. 


Thank you for visiting my blog today!  

Happy Stamping!

ONLY 3 DAYS LEFT!

Stampin' Up! has an amazing promotion this month!  In the USA, you can join Stampin' Up! for only $75!  What do you get for $75 +tax?  I'm so glad you asked.  You can choose up to $125 worth of Stampin' Up Merchandise as your kit contents.  That's right, YOU choose your kit!  Plus, you will get a Paper Pumpkin Kit (not the current one) and FREE shipping!  
Learn more here.  Contact me if you have any questions, I would love to help you build your kit!

PRODUCT LIST
Please use Host Code VNCZG7VK when placing orders under $150 during the month of November 2021.


Friday, November 26, 2021

Stampin' Up! Whimsical Trees Tiny Slimline ~ Card from the Catalog


Hi! Happy day after Thanksgiving!  Today's card is, you guessed it, from the catalog!  I did make a small change on this one...literally, I just made the card a smidge smaller than what is in the catalog!  Stampin' Up!'s Whimsical Trees is a fun stamp set that I have used often the last few months.  However, most of the cards I have made, and seen others make, use the trees, but not so much the ornaments.  These ornaments are super cute and deserve some attention, too! 


MEASUREMENTS
Card Base ~ Misty Moonlight Cardstock ~ 5" x 4-1/2", score at 2-1/2"
Layer 1 ~ Basic White Cardstock ~ 4-1/2" x 2-1/4"
Layer 2 ~ Polished Pink Cardstock ~ scrap at least 2" x 1"
Inside Layer ~ Basic White Cardstock ~ 4-1/4" x 2-1/4"

  • Use Tuxedo Black Memento Ink to stamp the ornaments across Layer 1, varying the height of the ornaments as you stamp. 
  • Color the ornaments with a Blushing Bride Stampin' Write Marker and Stampin' Blends in Misty Moonlight, Mossy Meadown, Mint Macaron and Polished Pink.  No need to worry about coloring these images perfectly.  
  • Stamp the sentiment on the small piece of Polished Pink Cardstock.  Then, trim around it with a Paper Trimmer or Paper Snips
  • Adhere Layer 1 to the card base with Liquid Glue. 
  • Attach the sentiment strip to Layer 1 with Stampin' Dimensionals. 

For the inside, stamp the ornaments in the top right corner of the inside layer.  Then, color the ornaments to match the ones on the front of your card.  Adhere the inside layer to the inside of your card base. 


Thank you for visiting my blog today!  I hope you enjoyed this card, maybe learned a little something and were inspired to go create something!

Happy Stamping!


ONLY 4 DAYS LEFT!

Stampin' Up! has an amazing promotion this month!  In the USA, you can join Stampin' Up! for only $75!  What do you get for $75 +tax?  I'm so glad you asked.  You can choose up to $125 worth of Stampin' Up Merchandise as your kit contents.  That's right, YOU choose your kit!  Plus, you will get a Paper Pumpkin Kit (not the current one) and FREE shipping!  
Learn more here.  Contact me if you have any questions, I would love to help you build your kit!

PRODUCT LIST
Please use Host Code VNCZG7VK when placing orders under $150 during the month of November 2021.


Thursday, November 25, 2021

Stampin' Up! Delivering Cheer Christmas Card


Happy Thanksgiving! I hope you are enjoying this day with people you love.  I thought about sharing a thanks card today, but then I saw this sketch over at Freshly Made Sketches and decided to make this card instead.  I love it when a sketch instantly plants a card in my head!  :)


This card required lots of fussy cutting, but I think it was totally worth it!  I was also excited to use Wink of Stella on the wrapping around the flowers.  During On Stage this year I learned that we can dip the tip of the Wink of Stella brush in a bit of ink to paint with it like it's a Water Painter.  Such fun!

MEASUREMENTS
Card Base ~ Evening Evergreen Cardstock ~ 8-1/2" x 5-1/2", score at 4-1/4"
Layer 1 ~ Polished Pink Cardstock ~ 4-1/8" x 5-3/8"
Layer 2 ~ Ever Eden Specialty Designer Series Paper ~ 4" x 5-1/4"
Layer 3 ~ Polished Pink Cardstock ~ 1/2" x 4"
Basic White Cardstock for the girl, and boots
Scrap of Ever Eden SDSP for her coat

Inside Layer 1 ~ Basic White Cardstock ~ 4" x 5-1/4"
Inside Layer 2 ~ Ever Eden Specialty Designer Series Paper ~ 1/2" x 4"

  • Use Tuxedo Black Memento Ink to stamp the girl on Basic White Cardstock.  I used my Stamparatus to get the top and bottom portions lined up perfectly.  
  • Fussy cut around the girl.  Get especially close when cutting around her boots and coat. 
  • Use Tuxedo Black Memento Ink to stamp the coat on the Ever Eden SDSP scrap.  I used my Stamparatus again for this part.  You will need to stamp both the top and bottom. 
  • Fussy cut around the coat.
  • Stamp the boots on a scrap of Basic White Cardstock with Polished Pink ink. 
  • Use Polished Pink Stampin' Blends to color her gloves on the main piece.
  • Dip the tip of Wink of Stella in a bit of Polished Pink ink (with the Stampin' Pad closed, squeeze it to get a bit of ink in the lid, then open it).  Color the tissue wrapping around the flowers with the 'pink' Wink of Stella, dipping the tip in Polished Pink as needed. 
  • Color the bouquet with Stampin' Blends (Evening Evergreen, Soft Succulent and Polished Pink)
  • Use Liquid Glue to attach the coat and boots to the girl. 
  • Stamp the sentiment with Tuxedo Black Memento ink on Layer 3
  • Adhere Layer 1 to the card base with your favorite adhesive (mine is Liquid Glue).  Then, adhere Layer 2 to Layer 1 and Layer 3 to Layer 2, as shown. 
  • Attach the girl to the front of the card with Stampin' Dimensionals. 

For the inside, attach the strip of Ever Eden DSP to the Basic White Cardstock with Liquid Glue or Stampin' Seal.  Then, use that same adhesive to attach the Basic White CS to the inside of your card. 


Thank you for visiting my blog today!  I hope you enjoyed this card, maybe learned a little something and were inspired to go create something!

Happy Stamping!


Stampin' Up! has an amazing promotion this month!  In the USA, you can join Stampin' Up! for only $75!  What do you get for $75 +tax?  I'm so glad you asked.  You can choose up to $125 worth of Stampin' Up Merchandise as your kit contents.  That's right, YOU choose your kit!  Plus, you will get a Paper Pumpkin Kit (not the current one) and FREE shipping!  
Learn more here.  Contact me if you have any questions, I would love to help you build your kit!

PRODUCT LIST
Please use Host Code VNCZG7VK when placing orders under $150 during the month of November 2021.


Wednesday, November 24, 2021

Stampin' Up! Sweet Strawberry Quick & Easy Cards


Hi there!  On today's Facebook Live I shared a little bit about what I would include in my Starter Kit if I was an absolute beginner.  The cards I made are examples of what I could do with those items from my pretend kit.  These cards are fast, perfect for a beginner stamper and require few supplies.  However, with even these simple cards I was able to demonstrate the masking technique, which is perfect for beginner stampers.   


I chose this Sweet Strawberry set as one I would add to my starter kit for several reasons.  My first criteria when looking for a stamp set was that it was photopolymer.  I like stamping with photopolymer because they are super easy to clean (you really just need water) and they are clear, which makes stamping a breeze.  (I do also love my cling stamps, but I was thinking of someone just starting out, with limited supplies.)

My 2nd criteria was that it has several sentiments.  I wanted a stamp set that I could use for birthdays, thank you cards, and just to say hi.  This one fit the bill perfectly.  Plus, I think strawberries are a great choice for anybody.  

Bonus criteria: this stamp set has a coordinating Strawberry Builder Punch.  Even better, you can purchase the stamps and the punch together and get 10% off!  


Of course, the best thing about the starter kit, other than it is only $75 (USA) through the end of November '21, is that YOU get to pick up to $125 of product for your kit.  I love that every single Starter Kit ordered can be it's own unique kit!  You also get a past Paper Pumpkin Kit, business supplies and FREE shipping!


I would love to help you build your Starter Kit, place an online order, or just answer any stamping questions you may have.  Contact me here, or you can join my team here.

Thanks for reading my blog.  :)

Happy Stamping! 


PRODUCT LIST
Please use Host Code VNCZG7VK when placing orders under $150 during the month of November 2021.

Tuesday, November 23, 2021

Stampin' Up! Holly Jolly Wishes Tiny Slimline Card and Envelope


I am so excited about this tiny little card and it's matching little envelope!  It's quick and easy to make, even when making the matching envelope.  Plus, you only need one piece of 6" x 6" paper to create the envelope, so any of our DSP is perfect!

For this card I decided to keep it pretty simple and just used one stamp from my favorite Christmas sentiment stamp set of the year... Holly Jolly Wishes.  The DSP I chose to use is the very versatile Tidings of Christmas Designer Series Paper, which can be found in the annual catalog. 


MEASUREMENTS
Card Base ~ Cherry Cobbler Cardstock ~ 5" x 4-1/2", score at 2-1/2"
Layer 1 ~ Tidings of Christmas DSP ~ 4-1/4" x 2-1/4"
scrap of Basic White CS for the sentiment
Inside Layer 1 ~ Basic White Cardstock ~ 4-1/4" x 2-1/4"
Inside Layer 2 ~ Tidings of Christmas DSP ~ 1/4" x  2-1/4"

ENVELOPE MEASUREMENTS
Designer Series Paper ~ 6" x 6"
score at 2" and 4-3/4"
TURN and score at 3/4" and 5-1/2"


Rather than type the instructions out for this one, I am going to attach my YouTube video tutorial for this one at the end of this post for you.  It is just under 18 minutes long and you can always fast forward to the part you need.  ;)


Thanks for stopping by my blog!  


Happy Stamping! 


Stampin' Up! has an amazing promotion this month!  In the USA, you can join Stampin' Up! for only $75!  What do you get for $75 +tax?  I'm so glad you asked.  You can choose up to $125 worth of Stampin' Up Merchandise as your kit contents.  That's right, YOU choose your kit!  Plus, you will get a Paper Pumpkin Kit (not the current one) and FREE shipping!  
Learn more here.  Contact me if you have any questions, I would love to help you build your kit!

PRODUCT LIST
Please use Host Code VNCZG7VK when placing orders under $150 during the month of November 2021.

Monday, November 22, 2021

Stampin' Up! Peaceful Deer Christmas Card


Happy Monday y'all!  Here's a quick and easy Christmas Card for you using Stampin' Up!'s Peaceful Deer Stamps and Tidings of Christmas Designer Series Paper.  This stamp set is perfect for all levels of stampers, especially when you use it with the Deer Builder Punch.

MEASUREMENTS
Card Base ~ Sahara Sand Cardstock ~ 8-1/2" x 5-1/2", score at 4-1/4"
Layers 1 & 2 ~ Tidings of Christmas DSP ~ 3" x 4"
scraps of Soft Suede and Basic White
Inside Layer ~ Basic White Cardstock ~ 4" x 5-1/4"

  • Stamp the deer using Soft Suede ink on the Soft Suede scrap of cardstock
  • Use Evening Evergreen ink to stamp the trees on the lower right corner of Layer 2.  I did stamp off before stamping the largest tree and the smallest trees. 
  • Stamp 'Merry Christmas' on the scrap of Basic White CS.
  • Punch out the stamped deer with the Deer Builder Punch.  Use Liquid Glue to attach it's antlers.
  • Trim around the sentiment with either Paper Snips or your Paper Trimmer.  Then, use the Banners Pick a Punch to punch one end of the Basic White CS, as shown. 
  • Use Liquid Glue to adhere Layers 1 & 2 to the card base. 
  • Attach the deer and sentiment pieces with Stampin' Dimensionals. 

On the inside layer, stamp the deer in the lower right corner with Soft Suede ink.  Then use Evening Evergreen ink to stamp the sentiment.  Adhere the inside layer to the inside of your card with your favorite adhesive, mine is still Liquid Glue. 


Thanks for stopping by my blog!  

Happy Stamping! 


Stampin' Up! has an amazing promotion this month!  In the USA, you can join Stampin' Up! for only $75!  What do you get for $75 +tax?  I'm so glad you asked.  You can choose up to $125 worth of Stampin' Up Merchandise as your kit contents.  That's right, YOU choose your kit!  Plus, you will get a Paper Pumpkin Kit (not the current one) and FREE shipping!  
Learn more here.  Contact me if you have any questions, I would love to help you build your kit!

PRODUCT LIST
Please use Host Code VNCZG7VK when placing orders under $150 during the month of November 2021.


Saturday, November 20, 2021

Stampin' Up! Penguin Place Birthday Card ~ Casually Crafting Blog Hop & Sketch Saturday Challenge


Today's card was created for our Casually Crafting Blog Hop (be sure to check out all of the other blogs included in this hop) and for a challenge at Sketch Saturday.  For Casually Crafting this month, we were challenged to create a card using only Basic Black, Basic Gray and Basic White. 

So, who is the Casually Crafting Design Team?  We are an international group of Independent Stampin' Up! Demonstrators who want to share our take on casual crafting.  We will share what we love with you monthly.  Be sure to check out the rests of the design team's projects using the links at the bottom of this post.


I have to admit, this challenge was more difficult than usual for me.  I LOVE color!  I think Basic Black, Basic Gray & Basic White are amazing and required mainly because they make other colors POP!  So, I couldn't resist adding a touch of just one extra color.  I can't wait to see how the other demonstrators on this blog hop completed the challenge.  How many broke the rules of this color challenge by adding just one more color?  I hope I'm not the only one!  


Evidently I was feeling a bit rebellious when I created this card, because I also changed things up a bit for the sketch challenge from Sketch Saturday.  I don't often make square cards, so I used the basic layout of this one on my normal 4-1/4" x 5-1/2" card size.  I also left out the fun swirlies and changed the circles to penguins.  I would love to see what you come up with for this Sketch Saturday Challenge and/or the color challenge! 


MEASUREMENTS
Card Base ~ Basic Black Cardstock ~ 8-1/2" x 5-1/2", score at 4-1/4"
Layer 1 ~ Pattern Party Designer Series Paper (HOST) ~ 4" x 5-1/4"
 Layer 2 ~ Basic White Cardstock ~ 2-3/4" x 3-3/4"
Basic White, Basic Gray & Basic Black scraps for the penguin
Inside Layer ~ Basic White Cardstock ~ 4" x 5-1/4"
  • Use the Penguin Builder Punch to punch out three Basic Black penguin bodies, 3 Basic White penguin tummies & 6 Basic Gray penguin feet
  • Stamp the eyes on the penguins with Tuxedo Black Memento ink and the beak with Basic Gray ink
  • Attach the feet, tummies & bodies to create your penguins
  • Use Gorgeous Grape (or color of your choice) to stamp a beanie, bowtie & scarf.  Fussy cut each one, then attach them to the penguins with Liquid Glue
  • Stamp the sentiment in Tuxedo Black Memento ink on Layer 2.  I used my Stamparatus so it was easy to stamp twice and get a nice, dark image
  • Wrap approximately 5" of Black Glittered Organdy Ribbon around the right side of Layer 1, attaching the ends with Glue Dots  (I only have the White Glittered Organdy Ribbon, so I colored it with my Black Stampin' Blend before attaching it)
  • Attach Layer 1 to the card base.  
  • Use Stampin' Dimensionals to attach Layer 2 to Layer 1, as shown
  • Once you have figured out the placement of your penguins, attach the top two with Liquid Glue.  Then, use a Stampin' Dimensional behind the head of the 3rd penguin and Liquid Glue on its body to attach it as shown. 

Stamp the penguin on the inside of the card, using Tuxedo Black Memento ink for the body, Basic Gray for the beak and feet and Gorgeous Grape for the heart.  Adhere the inside layer to the inside of your card. 


Thanks for stopping by my blog!  I hope you will have time to check out the other blogs in this blog hop...I'm sure there will be some amazing cards to see!

Happy Stamping! 

Blog Hop Links


Stampin' Up! has an amazing promotion this month!  In the USA, you can join Stampin' Up! for only $75!  What do you get for $75 +tax?  I'm so glad you asked.  You can choose up to $125 worth of Stampin' Up Merchandise as your kit contents.  That's right, YOU choose your kit!  Plus, you will get a Paper Pumpkin Kit (not the current one) and FREE shipping!  
Learn more here.  Contact me if you have any questions, I would love to help you build your kit!

PRODUCT LIST
Please use Host Code VNCZG7VK when placing orders under $150 during the month of November 2021.


Friday, November 19, 2021

Stampin' Up! Shaded Summer ~ Card from the Catalog


Hello & Welcome to my blog!  Thank you for stopping by.  Today's card is straight out of the catalog...well, mostly.  It certainly looks like the card found on page 103 of the 2021-2022 Annual Stampin' Up! Catalog.  However, I didn't quite have all the recommended supplies for this card, so I did substitute a few things.  


For instance, the card in the catalog uses Playing with Patterns Resin Dots, and for some reason, I don't have those.  I'm not sure why because they are so versatile and can be used on almost any project.  (I really think I need them.)  I do have Pearl Basic Jewels and Bermuda Bay Stampin' Blends.  So, I used my light Bermuda Bay Stampin' Blend to color some of the pearls.

I also don't have the Watercolor Shapes stamps.  Which you would think would be kind of a big deal.  It's not though, because I was able to improvise with my Versamark pad and Water Painters.  


This card would definitely be faster to create with the Watercolor Shapes stamps, but I think it turned out pretty good with my substitutions.  What do you think? 


I'll add the supply list at the bottom of this post, including supplies for both versions of this card (mine and the catalog's) so you can decide which one you want to make.  I will also add the video below, and the Measurements below that! 

Happy Stamping!


MEASUREMENTS
Card Base ~ Pale Papaya Cardstock ~ 8-1/2" x 5-1/2", score at 4-1/4"
Layer 1 ~ Shimmery White Cardstock ~ 2-1/4" x 3-3/4"
Layer 2 ~ Basic White Cardstock ~ 5/8" x 2-1/4"
Inside Layer ~ Basic White Cardstock ~ 4" x 5-1/4"


Stampin' Up! has an amazing promotion this month!  In the USA, you can join Stampin' Up! for only $75!  What do you get for $75 +tax?  I'm so glad you asked.  You can choose up to $125 worth of Stampin' Up Merchandise as your kit contents.  That's right, YOU choose your kit!  Plus, you will get a Paper Pumpkin Kit (not the current one) and FREE shipping!  
Learn more here.  Contact me if you have any questions, I would love to help you build your kit!

PRODUCT LIST
Please use Host Code VNCZG7VK when placing orders under $150 during the month of November 2021.