Wednesday, August 31, 2022

Stampin' Up! Honeybee Home with Hive 3D Embossing Folder


I have weddings on the brain!  We have some precious friends getting married in October and have the honor of holding a Wedding Shower for them here in September.  Then, my favorite (and only) brother is getting married in November and we get to host their reception for family in December!  All that to say, it's an exciting time and this card made me think of all the happy news!  :)


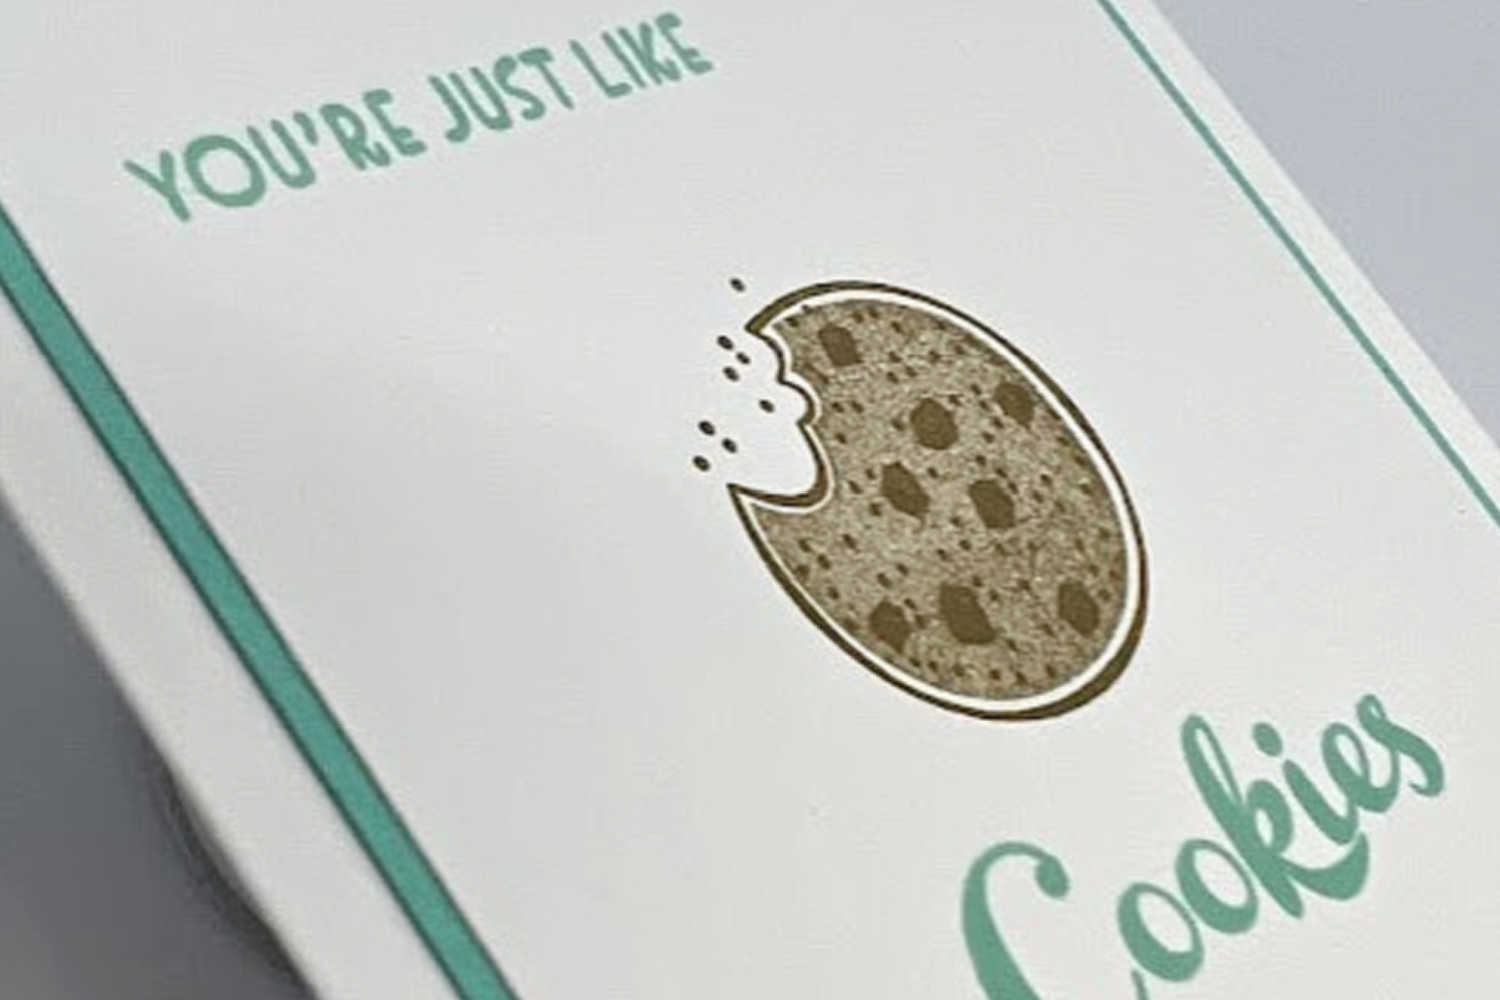
Have you embossed on Vellum Cardstock?  It's pretty cool, and certain embossing folders, like the Hive 3D Embossing Folder, are even more amazing when used on vellum.  To attach the vellum to the card base, I used quite a bit of Stampin' Seal behind the banner and a little around the rest of the vellum piece.

The solid flower pieces were attached with a touch of liquid glue on the bottom half of each flower.  For the stamped flowers, I used a couple of Mini Stampin' Dimensionals at the top of the flowers and glue at the bottom.  Did you notice the grass going through the hole in the flowers?  


Of course I couldn't resist stamping the flowers inside the card.  I thought about coloring these with Orchid Oasis, but decided I really like the Petal Pink!


Thanks for visiting my blog today!  Scroll to the end for the products used on this card.  The list is clickable, if you need to add them to your stamping stash! 😉

Happy Stamping!

Today is the LAST DAY for SALE-a-bration!  Don't miss your chance to choose 1 FREE SAB for every $50 or $100 in purchased Stampin' Up! Product! There's no limit to how many freebies you can earn.

PRODUCT LIST
Click on any of the photos below to go straight to that item in my online store.
During the month of August 2022, please use Host Code N9FS9B7J on orders under $150.  Thank you!


Tuesday, August 30, 2022

Stampin' Up! Honeybee Home ~ Card from the Catalog


This week's Card from the Catalog can be found on p. 74 of the 2022-2023 Annual Catalog and features Stampin' Up!'s Honeybee Home stamps.  One tiny detail, it's not actually a card, but this Pretty Pillow Box. Because I chose something other than a card this time, I decided to go ahead and make a quick card to go with the pillow box.  These projects are both quick, so much so that they can easily be made in under 20 minutes!


Instead of using the Fresh Freesia & Highland Heather colors that were used in the catalog, I decided to use Balmy Blue and Pacific Point.  Partly because Pacific Point is one of the Watercolor Pencil colors and partly because I really like the blues with the yellow and black of the bee!


MEASUREMENTS
Pillow Box ~ Balmy Blue Cardstock ~ 4-1/2" x 6"
Card Base ~ Balmy Blue Cardstock ~ 8-1/2" x 5-1/2", score at 4-1/4"
Layer 1 ~ Perfectly Penciled DSP ~ 4" x 5-1/4"
Layer 2 ~ Balmy Blue Cardstock ~ 2-3/4" x 4-1/4"
Layer 3 ~ Basic White Cardstock ~ 2-1/2" x 4"

Watch my YouTube Tutorial if you would like to learn how to put these together. 

Thanks for looking at my blog today.
Happy Stamping!

It's that time again! Time for SALE-a-bration!  During SAB, which runs July 1 - August 31, 2022, choose 1 FREE SAB for every $50 or $100 in purchased Stampin' Up! Product! There's no limit to how many freebies you can earn.

PRODUCT LIST
Click on any of the photos below to go straight to that item in my online store.
During the month of August 2022, please use Host Code N9FS9B7J on orders under $150.  Thank you!

Saturday, August 27, 2022

Stampin' Up! Celebrate Sunflowers ~ Sketch Saturday


Sketch Saturday's Challenge #708 is perfect with Stampin' Up!'s Celebrate Sunflowers stamps.  I love it cards come together as quickly and easily as this one did!


MEASUREMENTS
Card Base ~ Thick Basic White Cardstock ~ 11" x 4-1/4", score at 5-1/2"
Layer 1 ~ Daffodil Delight Cardstock ~ 2" x 5-1/2"
Layer 2 ~ Basic white Cardstock ~ 1-3/4" x 5-1/2"
Scrap of Basic White (sunflower) ~ at least 2" x 2-1/4"
Scrap of Basic Black (sentiment) ~ at least 1/2" x 1-1/2"


  • Use Brick & Mortar Embossing Folder to emboss the front of the card base.
  • Stamp the sunflower with Tuxedo Black Memento ink. Color with Stampin' Blends.  Cut the sunflower out with the coordinating Sunflower Dies. 
  • Adhere Layer 1 to the center of the front of the card
  • Place a Glue Dot behind Layer 2, use this to one end of the twine to before wrapping it around three times (then attach the other end of the twine to the same Glue Dot to hold it in place).  Tie a bow around the twine, as shown. 
  • Put Liquid Glue on the back of the sunflower, then carefully slide it under the twine and adhere to Layer 2. 
  • Use Stampin' Dimensionals to attach Layer 2 to Layer 1. 
  • Stamp 'thanks' from 'thanks a bunch' with Versamark ink on a scrap of Basic Black Cardstock.  Heat emboss it with White Embossing Powder. Then cut around 'thanks'.
  • Place a Black Mini Stampin' Dimensional behind the 'nks' of 'thanks' and a bit of Liquid Glue behind the 'tha'.  Place the sentiment on the front of the card, as shown. 


Thank you for visiting my blog today.  I hope you were inspired by the sketch or my card (or both!)  Be sure to check out this challenge post over at Sketch Saturday to see the cards by the rest of the design team.  I hope you can play along with us!

Happy Stamping!

It's that time again! Time for SALE-a-bration!  During SAB, which runs July 1 - August 31, 2022, choose 1 FREE SAB for every $50 or $100 in purchased Stampin' Up! Product! There's no limit to how many freebies you can earn.

PRODUCT LIST
Click on any of the photos below to go straight to that item in my online store.
During the month of August 2022, please use Host Code N9FS9B7J on orders under $150.  Thank you!


Friday, August 26, 2022

Stampin' Up!'s Celebrate Sunflowers ~ Gift Bag & Tag Decorating


Stamping isn't just for card making!  Decorate beautiful gift bags or make sweet little tags with Stampin' Up!'s Celebrate Sunflowers stamps.  I purchased these gift bags from Amazon and try to keep them on hand for birthday, Christmas, weddings, baby and just because gifts.  They are great because I can use my stamping supplies to decorate them for any occasion!  


Stampin' Up!'s Tailored Made Tags are PERFECT for creating quick gift tags for any occasion, and any size gift!  These are also fun to make and put on the front of cards.


Watch my YouTube tutorial below to see how easy it is to put these together for beautiful gift giving!


Happy Stamping! 

It's that time again! Time for SALE-a-bration!  During SAB, which runs July 1 - August 31, 2022, choose 1 FREE SAB for every $50 or $100 in purchased Stampin' Up! Product! There's no limit to how many freebies you can earn.

PRODUCT LIST

Thursday, August 25, 2022

Stampin' Up! Celebrate Sunflowers ~ Ink & Inspiration Blog Hop


Hey Stampers & Friends!  Welcome to the Ink & Inspiration Blog Hop.  I'm excited to be part of this fun and creative group sharing stamping ideas with you today!


This week's Color Challenge photo is below with six colors ~ Balmy Blue, Pale Papaya, So Saffron, Soft Sea Foam, Pear Pizzazz and Evening Evergreen.  Our other option was to use the photo as inspiration (I forget that a lot!)  If we are feeling super crafty & creative we can also combine both the ink & inspiration parts of the challenge.  

I'm excited that I used all SIX colors in this week's challenge on my card!


I'm having a lot of fun playing with Celebrate Sunflowers and the coordinating Sunflowers Dies this week.  For this card, I started by stamping the large sunflower with Pale Papaya ink on a piece of So Saffron Cardstock.  After die cutting the stamped sunflower, I used the intricate sunflower die to cut a piece of Pale Papaya cardstock (with an Adhesive Sheet on the back) to layer over the top.  I repeated this process with the leaves, using Evening Evergreen ink to stamp on Pear Pizzazz cardstock. 


To attach all the pieces, I started by gluing the leaves to the Vellum layer.  Then, I used a few Stampin' Dimensionals to attach the Sunflower.  The Balmy Blue leaves were added by applying a touch of Liquid Glue to lower leaves, then sliding under the Sunflower.  For the sentiment piece, I attached three Stampin' Dimensionals and a dab of glue on the back before attaching it to the Vellum.  Once the layers were all added to the Vellum, I turned it over and added Liquid Glue behind all the pieces, so it wouldn't show from the front. I finished by adding a few butterflies to the front of the card (and one to the inside). 


MEASUREMENTS
Card Base ~ Soft Sea Foam Cardstock ~ 8-1/2" x 5-1/2", score at 4-1/4"
Layer 1 ~ Vellum Layering Designs ~ 3-3/4" x 5"
Sunflower Layer 1 ~ So Succulent Cardstock ~ at least 3-1/2" x 3-1/2"
Sunflower Layer 2 ~ Pale Papaya Cardstock ~ at least 3-1/2" x 3-1/2"
Leaves Layer 1 ~ Pear Pizzazz Cardstock ~ at least 1-1/4" x 1-1/4" (*2)
Leaves Layer 2 ~ Evening Evergreen Cardstock ~ at least 1-1/4" x 1-1/4" (*2)
 Long Leaves ~ Balmy Blue Cardstock ~ at least 1-3/4" x 3"
Sentiment ~ Basic White Cardstock ~ at least 1-1/4" x 2-1/4" 

Thanks for stopping by today!  I hope my card, or the inspiration picture/colors have inspired your creativity.  Don't forget to visit the other blogs for more ideas and inspiration. 

Happy Stamping! 

BLOG HOP LIST

It's that time again! Time for SALE-a-bration!  During SAB, which runs July 1 - August 31, 2022, choose 1 FREE SAB for every $50 or $100 in purchased Stampin' Up! Product! There's no limit to how many freebies you can earn.

PRODUCT LIST
Click on any of the photos below to go straight to that item in my online store.
During the month of August 2022, please use Host Code N9FS9B7J on orders under $150.  Thank you!

Wednesday, August 24, 2022

How do you design a handmade card?


How do you design a handmade card?  Personally, I almost always start with a sketch, like the one below from Sunday Stamps' Challenge #290.  Sketch Challenges are a great place to start when trying to decide how to start creating a card.  Another great place to find sketches is Stampin' Up!'s catalogs.  They don't have sketches, exactly, but you can look at any card and get a basic layout idea and go from there. That's how I usually design my cards for my Tuesday Card from the Catalog YouTube Videos


The next step, for me, is usually to figure out what colors combination I want to use.  If I'm creating for a specific person, I like to start with colors I know they like.  For instance, yesterday's card was inspired by my daughter, her love of sunflowers and the colors she chose to decorate her dorm room with. 

For today's card, I knew I wanted it to be a bit more masculine but wasn't sure about the exact color combination.  I looked through my Designer Series Paper and decided on this beautiful Rustic Harvest DSP.  The colors in it are perfect to use with Celebrate Sunflowers (my Stamp Set of the Week) and can be pretty masculine.  

Of course, another way I choose colors is to flip through my catalog and get inspiration from the colors used together in projects, page layouts and the Designer Series Papers in it.  

And, in a pinch, Pinterest is always a great place to go for inspiration! 


For the inside of the card, I often add a 4" x 5-1/4" piece of Basic White (or Very Vanilla) cardstock and a narrow strip of the DSP I used on the front of the card.  Other times I stamp a small stamp in the corner of the inside layer.  Occasionally I will do something else, but those are my go to insides for most of my cards. 


MEASUREMENTS
Card Base ~ Basic Black Cardstock ~ 11" x 4-1/4", score at 5-1/2"
Layer 1 ~ Rustic Harvest Designer Series Paper ~ 4" x 4" & 1" x 4"
Layer 2 ~ Rustic Harvest DSP ~ 2" x 4-3/4"
Sunflower Bottom Layer ~ Crushed Curry Cardstock ~ 3-1/2" x 3-1/2"
Sunflower Top Layer ~ Cajun Craze Cardstock ~ 3-1/2" x 3-1/2"
Sunflower Center ~ Merry Merlot Cardstock ~ 1"  x 1"
Sentiment ~ Basic Black Cardstock ~ scrap at least 2" x 1"


Thanks for looking at my blog today.
Happy Stamping!

It's that time again! Time for SALE-a-bration!  During SAB, which runs July 1 - August 31, 2022, choose 1 FREE SAB for every $50 or $100 in purchased Stampin' Up! Product! There's no limit to how many freebies you can earn.

PRODUCT LIST
Click on any of the photos below to go straight to that item in my online store.
During the month of August 2022, please use Host Code N9FS9B7J on orders under $150.  Thank you!


Tuesday, August 23, 2022

Stampin' Up!'s Celebrate Sunflowers ~ Card from the Catalog


This week's Card from the Catalog, at first glance, is quite different from the original inspiration card, which can be found on p. 50 of the 2022 July-December Mini Catalog.  The first difference is that I used Celebrate Sunflowers while the original used Hello Harvest.  Of course, I also replaced the Rustic Harvest Designer Series Paper with Abigail Rose DSP, which meant the entire color combination had to change. 


My daughter's birthday week, her love of sunflowers and her choice of dorm room colors all inspired the changes I made to this card.  I did copy the layout of the card, almost exactly.  The few changes I made were mostly because I didn't have the original supplies, like the awesome Fabulous Frames Dies (I REALLY need those, I think.)


MEASUREMENTS
Card Base ~ Petal Pink Cardstock ~ 11" x 4-/4", score at 5-1/2"
Layer 1 ~ Soft Succulent Cardstock ~ 4-1/8" x 5-3/8"
Layer 2 ~ Abigail Rose DSP ~ 4" x 5-1/2"
Layer 3 ~ Vellum Cardstock ~ 2-11/16" x 3-15/16"
Layer 4 ~ Brushed Metallic Cardstock ~ 2-3/4" x 4"
So Saffron Cardstock ~ approximately 3-1/2" x 3-1/2"
Petal Pink Cardstock ~ approximately 3-1/2" x 3-1/2"
Soft Suede Cardstock ~ at least 1" x 1"
Soft Succulent Cardstock ~ approximately 2" x 3-1/4"
Shimmery White Cardstock ~ at least 2-1/2" x 4-1/4"
Basic Black Cardstock ~ at least 3/4" x 3"

Watch my YouTube Tutorial for this card below. 

Happy Stamping!

It's that time again! Time for SALE-a-bration!  During SAB, which runs July 1 - August 31, 2022, choose 1 FREE SAB for every $50 or $100 in purchased Stampin' Up! Product! There's no limit to how many freebies you can earn.

PRODUCT LIST
Click on any of the photos below to go straight to that item in my online store.
During the month of August 2022, please use Host Code N9FS9B7J on orders under $150.  Thank you!

Saturday, August 20, 2022

Stampin' Up! Nothing's Better Than ~ Casually Crafting Blog Hop


Hey there!  Thanks for stopping by!  Today I'm taking part in a blog hop with the Casually Crafting Design Team!  We are an international group of Independent Stampin' Up! Demonstrators who want to share our take on casual crafting.  We will share what we love with you monthly.  Be sure to check out the rests of the design team's projects using the links at the bottom of this post.


This month we have a color challenge.  These always stretch my creativity a bit more than the sketch challenges...I wonder why that is?  The three colors we are using are Sweet Sorbet, Sahara Sand, and Coastal Cabana.  I really want to go to the beach now, how about you!?


Another part of our challenge is to keep these cards pretty simply, without using Stampin' Cut & Emboss Machines.  I love this because it challenges me to use just a few items, like I did when I was new to stamping, or when I'm traveling.  

I did decide to use my Stamparatus for these, instead of Clear Blocks, so I could restamp the images.  First, I stamped the image outline once, then I stamped the inside once.  I always ended by stamping the image outline again, just to make it nice and dark.  The Stamparatus makes this SO easy!  Don't have a Stamparatus?  Until you get one, just stamp the outline, then stamp off before stamping the inside of the image.


I didn't take pictures of the insides of the cards...but thought you might want to know what each card says in its entirety. 
A day without chocolate is like, ummm... Just kidding, I have no idea.
Today's Plan: Consume Cofee and be awesome!
You're just like cookies you make everything better. 

MEASUREMENTS
Layer 1 ~ Note Cards & Envelopes, Basic White ~ The note cards are precut & scored. 
They measure 3-1/2" x 5"
Layer 2 ~ Coastal Cabana/Sahara Sand/Sweet Sorbet ~ 3-1/8" x 4-3/8"
Layer 3 ~ Basic White Cardstock ~ 3" x 4-1/2"

Don't forget to hop along to the next blog to see more stamping creativity. 
Happy Stamping!

BLOG HOP LIST

It's that time again! Time for SALE-a-bration!  During SAB, which runs July 1 - August 31, 2022, choose 1 FREE SAB for every $50 or $100 in purchased Stampin' Up! Product! There's no limit to how many freebies you can earn.

PRODUCT LIST
Click on any of the photos below to go straight to that item in my online store.
During the month of August 2022, please use Host Code N9FS9B7J on orders under $150.  Thank you!

Friday, August 19, 2022

Stampin' Up! Nothing's Better Than ~ chocolate Mini Pocket Envelope


Today I'm sharing a mini treat for chocolate lovers instead of a card, using Stampin' Up!'s Nothing's Better Than stamps and Mini Pocket Envelope Dies.  I am so excited that the chocolate I buy at Aldi fits inside these little pockets!  This is one little gift that goes together very quickly.  Bonus ~ you can slip a gift card, note, or business card in behind the chocolate!


MEASUREMENTS
*complete Product List at the end of this post
2022-2024 In Color Designer Series Paper ~ 6" x 4-1/2"
Strawberry Sorbet Cardstock ~ 2-1/2" x 3"
Scrap of Basic White Cardstock 


Watch my YouTube Tutorial below to see how quick and easy (& FUN) these are to put together!  I'm looking forward to making a bunch with friends, then passing them out to people I come across in my day-to-day errands!

Happy Stamping!

It's that time again! Time for SALE-a-bration!  During SAB, which runs July 1 - August 31, 2022, choose 1 FREE SAB for every $50 or $100 in purchased Stampin' Up! Product! There's no limit to how many freebies you can earn.

PRODUCT LIST
Click on any of the photos below to go straight to that item in my online store.
During the month of August 2022, please use Host Code N9FS9B7J on orders under $150.  Thank you!

Wednesday, August 17, 2022

Stampin' Up! Nothing's Better Than ~ Card from the Catalog


Turn to p. 20 of Stampin' Up!'s 2022-2023 Annual Catalog to find the original version of this week's Card from the Catalog.  Both cards feature Nothing's Better Than stamps and of course, Love You More Than Dies.

I did change the color scheme for this card, which meant changing the Designer Series Paper, too.  However, the layout of the card is the same.  You can find a clickable list at the bottom of this post for all of the products I used creating my version of this card. 


MEASUREMENTS
Layer 1 ~ Old Olive Cardstock ~ 8-1/2" x 5-1/2", score at 4-1/4"
Layer 2 ~ Polished Pink Cardstock ~ 1-1/2" x 1-3/4" (*4)
Layer 3 ~ Silver & Gold Designer Series Paper ~ 3" x 4"
Layer 4 ~ Silver & Gold Designer Series Paper ~ 3" x 3"
Layer 5 ~ Vellum Cardstock ~ 3" x 3"
Scraps of Basic White Cardstock and Small Scrap of Orchid Oasis Cardstock 


This fun card uses several easy and fun stamping techniques, including heat embossing, blending, stamping off, two-step stamping and very simple fussy cutting (the 'everything').  Watch my YouTube Tutorial for this card to learn how!

Happy Stamping! 

It's that time again! Time for SALE-a-bration!  During SAB, which runs July 1 - August 31, 2022, choose 1 FREE SAB for every $50 or $100 in purchased Stampin' Up! Product! There's no limit to how many freebies you can earn.

PRODUCT LIST
Click on any of the photos below to go straight to that item in my online store.
During the month of August 2022, please use Host Code N9FS9B7J on orders under $150.  Thank you!
 

Saturday, August 13, 2022

Stampin' Up! Amazing Phrasing ~ Sketch Saturday


This fun birthday card was inspired by Sketch Saturday's Sketch Challenge 707 and features Stampin' Up!'s Amazing Phrasing and This Birthday Piggy stamp sets.  


MEASUREMENTS
Card Base ~ Daffodil Delight Cardstock ~ 8-1/2" x 5-1/2", score at 4-1/4"
Layer 1 ~ Balmy Blue Cardstock ~ 2" x 5-1/2"
Layer 2~ Basic White Cardstock ~ 2" x 2"
Scraps of Basic White Cardstock & a scrap of Balmy Blue Cardstock


  • Adhere the Balmy Blue Cardstock to the top of the card base.  Then, place the front of the card base in the Painted Textures 3D Embossing Folder and run through the Stampin' Cut & Emboss Machine.  (You have to turn the embossing folder sideways, which is NOT recommended by Stampin' Up!)
  • Stamp the piggy, cake & balloon on a scrap of basic white cardstock with Tuxedo Black Memento ink.  Color with Stampin' Blends.  (also stamp an extra balloon)
  • Fussy cut around the piggy and balloon (plus the extra balloon) leaving a bit of a white border
  • Tightly fussy cut around the cake.  Then, trace around the edge of the cake with a Black Stampin' Write Marker (using the side of the brush tip)
  • Stamp the sentiments on the scraps of cardstock with Memento ink.  (I used my Stamparatus so I could stamp 'amazing' several times to make sure it was nice and dark)
  • Fussy cut around each word.
  • Wrap Bakers twine around the card front twice, where the two cardstocks meet.  Tie a bow around the twine, near the center. 
  • Use Stampin' Dimensionals to attach the square piece of cardstock, as shown. 
  • Adhere the piggy with Liquid Glue and the balloon that is attached to the piggy with a Stampin' Dimensional
  • Place a dab of Liquid Glue behind the extra balloon string and a Mini Stampin' Dimensional behind the balloon before adding it to the square. 
  • Adhere the cake with Liquid Glue.
  • Use Mini Stampin' Dimensionals (cut in half where necessary) to attach the words to the bottom of the card front. 

Thank you for visiting my blog today.  I hope you were inspired by the sketch or my card (or both!)

Happy Stamping!

It's that time again! Time for SALE-a-bration!  During SAB, which runs July 1 - August 31, 2022, choose 1 FREE SAB for every $50 or $100 in purchased Stampin' Up! Product! There's no limit to how many freebies you can earn.

PRODUCT LIST
Click on any of the photos below to go straight to that item in my online store.
During the month of August 2022, please use Host Code N9FS9B7J on orders under $150.  Thank you!