Saturday, February 24, 2024

Stampin' Up! Ice Cream Swirl - Sketch Saturday


Hello and welcome to my blog!  This card was created for Sketch Saturday's Challenge #745. Today is the first day of this challenge, you have two weeks to play along.  The optional challenge for this sketch is to use green.  When designing my card, I totally forgot about the optional challenge!  


I started by stamping the strawberry multiple times on a piece of Sweet Sorbet Cardstock with Versamark ink.  After sprinkling the stamped strawberries with Black Embossing Powder, I set them with my Heat Tool.  I repeated this with the cherry on another piece of Sweet Sorbet, then with the donut on a square of Calypso Coral Cardstock.  


The Ice Cream top was stamped with Sweet Sorbet ink.  I wasn’t loving the red on white, so I used a Small Blending Brush to blend some Calypso Coral Ink over the ice cream before using the coordinating die to cut it out.  I decided to have a little fun with the little bowl, and used the ice cream embossing die on a piece of Crumb Cake Cardstock before die cutting the bowl. 


Thank you for visiting my blog today.  Be sure to have a look at the cards the rest of Sketch Saturday’s Design Team have created.  Then, play along with us.  We would love to see what you create!

Happy Stamping! 

SUPPLY LIST
This list is clickable for your convenience.


Thursday, February 22, 2024

Stampin' Up! Ice Cream Swirl - Ink & Inspiration Blog Hop


Hey Stampers!  Welcome to the Ink & Inspiration Blog Hop.  I'm excited to be part of this fun & creative group sharing stamping inspiration with you today!


Our color challenge and photo inspiration for this month can be found in the photo below.  While the flowers are absolutely beautiful, it's once again the colors that inspired my card this month.  Which of these inspires you? 

I don't know what it is about these challenges, but they always make me want to use ALL the colors, even though that's not required and I don't typically use so many colors when creating. Sometimes I do, but usually I like to keep it to just a few. 


I decided way ahead of time that I wanted to use Stampin' Up!'s Ice Cream Swirl Bundle for this challenge.  My next decision was which colors to use for the ice cream.  I went with the Lemon Lolly for the cone.  First I stamped the cone on Basic White Cardstock, then I used a Small Blending Brush to lightly blend some of the ink all over the cone.  I used Bubble Bath to stamp the Ice Cream before cutting both pieces out with the coordinating dies. 

I cut 1-1/2" strips of cardstock in the remaining colors to adhere to my card base at a diagonal for the background.  This is a super simple way to get a colorful background very quickly.  I chose to use black & white for the sentiment to make it stand out. 


Thank you for visiting my blog today!  I hope you are inspired to create something colorful.  Be sure to visit the rest of the blogs listed below for even more inspiration. 

Happy Stamping!

BLOG HOP LIST

SUPPLY LIST
This list is clickable for your convenience.

Saturday, February 17, 2024

Stampin' Up! Fluffiest Friends handmade card


When I first started stamping, 20ish years ago, my first purchase was a cute little teddy bear stamp set from Stampin' Up!.  I used that stamp set for years (even though I had added many other stamps to my collection), and still have it on my stamp shelf.  The reason I'm telling you this is because I loved to color that stamp set with Watercolor Pencils, just like I love coloring the images from Fluffiest Friends stamps!


Like the previous two cards I posted about, this one was first colored with pencils, then I used a Blender Pen to smooth out the color a bit. When your new to stamping and just starting to build up your supplies, Watercolor Pencils and a Tuxedo Black Memento Pad are a great place to start.  Stamp with the black pad, then you have plenty of color choices to make fun and/or beautiful cards!


This is the third, and final, card in my Fluffiest Friends Class at Home.  Place a minimum $35 (pretax & shipping) order using Host Code CDQUVP6A by midnight February 20th to get this class FREE!

Happy Stamping!

SUPPLY LIST
This list is clickable for your convenience. 

Friday, February 16, 2024

Stampin' Up! Fluffiest Friends - Thank You Card


The first card I created with this bunny stamp was, of course, a birthday card.  However, I think it's appropriate to use on a thank you card.  After all, I would love for someone to thank me with a cupcake and sweet smile!  :)


The bunny was actually stamped on the inside of the card, after using a circle die from Stylish Shapes Dies to cut through the card front.  I love this technique!  Other than just being fun and a little different, it helps to keep your card flatter AND you don't need to do anything extra to the inside of your card.


This is the second card (of 3) in my Fluffiest Friends Class at Home. Get this class FREE with a minimum $35 purchase using Host Code CDQUVP6A, through February 20, 2024.

SUPPLY LIST
This list is clickable for your convenience.

Thursday, February 15, 2024

Marvelous Fluffiest Friends Handmade Card


I was talking to my husband this evening about some of the cards I have been making with Stampin' Up!'s Fluffiest Friends stamp set.  He was a little confused, (we were on the phone), and said, "Wait a minute, what did you say?  It sounded like Fluffiest Friends." I chuckled and confirmed that was exactly what I said. Then, I explained how cute this images only stamp set is!


I love using Stampin' Up!'s Watercolor Pencils to quickly color stamped images.  Once the image is colored, I go over it with a Blender Pen to smooth out the coloring and just give it a finished look.  The more color you add with the pencils, the easier it to blend with the Blender Pen.  I chose not to use a lot of color on this fluffy cat. 


This is the first of three cards that are part of my Fluffiest Friends Class at Home, which is available through February 20, 2024.  This class is FREE with a minimum $35 purchase.  Get the details. 

Happy Stamping!

SUPPLY LIST
This list is clickable for your convenience.

Thursday, February 8, 2024

Make a Sympathy Card with Stampin’ Up!’s Heartfelt Hexagon


Stampin’ Up!’s Heartfelt Hexagon stamp set is so versatile!  It can be used to create very simple cards are quite complex ones, simply elegant, super cute, or just plain fun!  

For today’s card, I have decided to to go for a little bit of understated elegance.  Begin by punching four or five Hexagons from Basic White Cardstock.  Then, place them in the Painted Posies 3D Embossing Folder and run them through the Stampin’ Cut & Emboss Machine. 

On another piece of Basic White Cardstock, stamp the sentiment in your color of choice, I used Poppy Parade. After stamping, use the Heartfelt Hexagon Punch to punch out the sentiment. 


While you have your ink handy, use a Blending Brush to blend some of the color on a 4” x 5-1/4” piece of Basic White Cardstock.  Start from the bottom of the cardstock and work you way up so that the color is heaviest on the bottom, going lighter as you go up until there is no color at all at the top. 

Place all of the hexagons on your blended panel, it’s okay if some of the edges are hanging over the side.  Once you have decided how you want to place them, start gluing down the embossed hexagons. Then, attached the sentiment piece with Stampin’ Dimensionals. 

Use Stampin’ Dimensionals to attach the panel to the front of your Thick Basic White Card Base.  Attach a bow under the sentiment with a Mini Glue Dot.  Then, add a few Classic Matte Dots around your card. 


Thank you for visiting my blog today.  Subscribe to my newsletter for more card ideas, Stampin’ Up! updates and more!

Happy Stamping!

SUPPLY LIST
This list is clickable for your convenience. 

Wednesday, February 7, 2024

Two Versions of the Same Easy Card


  At first glance these two cards might look pretty different, maybe.  However, they are almost exactly the same card!  By just changing the background, it gave the cards a bit of a different feel.  I did also change the ink color to coordinate and the card base. Stamps and embellishments stayed the same.


Don't like tying bows for your paper crafting projects?  No problem!  It's very easy to create this faux bow behind any shape.  (I show how to do this and make all the cards in my Heartfelt Hexagon Class at Home in my YouTube Tutorial HERE.)


Thank you for visiting my blog today!  Come back soon for more Heartfelt Hexagon (& Heartfelt Hellos) inspiration.

Happy Stamping!


This FREE with purchase class is available through February 8, 2024. Click HERE to learn more about this class, or my current Class at Home. 

SUPPLY LIST
This list is clickable for your convenience.

Monday, February 5, 2024

Mixing it Up a Little - Heartfelt Hexagon with the Cloud Punch


For this second card in my Heartfelt Hexagon Class to Go I decided to mix things up a little and use the Cloud Punch instead of the coordinating Hexagon Punch.  In order to do this, I had to mask one of the words so that it didn't get stamped with the rest. 


The theme of this class is quick & easy cards that can be simply changed by changing the paper, stamps & embellishments.  It's always a good idea to have a few card ideas that don't take much planning or time to make for any occasion. 


Thank you so much for visiting my blog today.  Come back in a couple of days for more ideas with Heartfelt Hexagon stamps.

Happy Stamping!


This FREE with purchase class is available through February 8, 2024.  Click HERE to learn more about this class, or my current Class at Home. 

SUPPLY LIST
This list is clickable for your convenience.

Saturday, February 3, 2024

Quick & Easy Handmade Card with Heartfelt Hexagon

images copyright Stampin' Up!

Happy Saturday!  How do you like to spend your Saturdays?  On weekends my hubby doesn't have to work, I like to go camping in our little teardrop travel trailer.  The weekends he is working, or cold & rainy weekends, I like to stamp the day away in my cozy craft room.


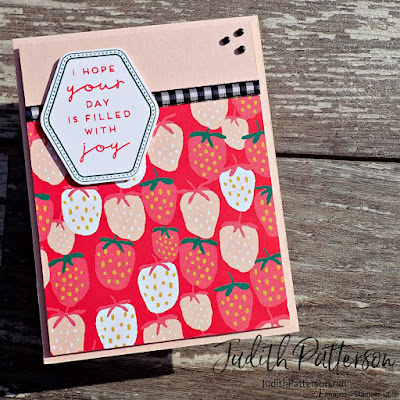
This is the first card in my Heartfelt Hexagon Class at Home (previously Class to Go).  This is probably one of the first layouts I ever used on a card, almost 20 years ago.  I love classic, simple layouts like this one.  This one is especially great because the DSP, shape, colors and embellishments are all completely interchangeable.  


All of the cards in this class are quick & easy to make and can be used with any stamps, pretty paper, and shapes.  

Happy Stamping!


This FREE with purchase class is available through February 8, 2024.  Click HERE to learn more about this class, or my current Class at Home. 

SUPPLY LIST
This list is clickable for your convenience.