Wednesday, November 30, 2022

Stampin' Up! Celebrate with Tags ~ Birthday Card


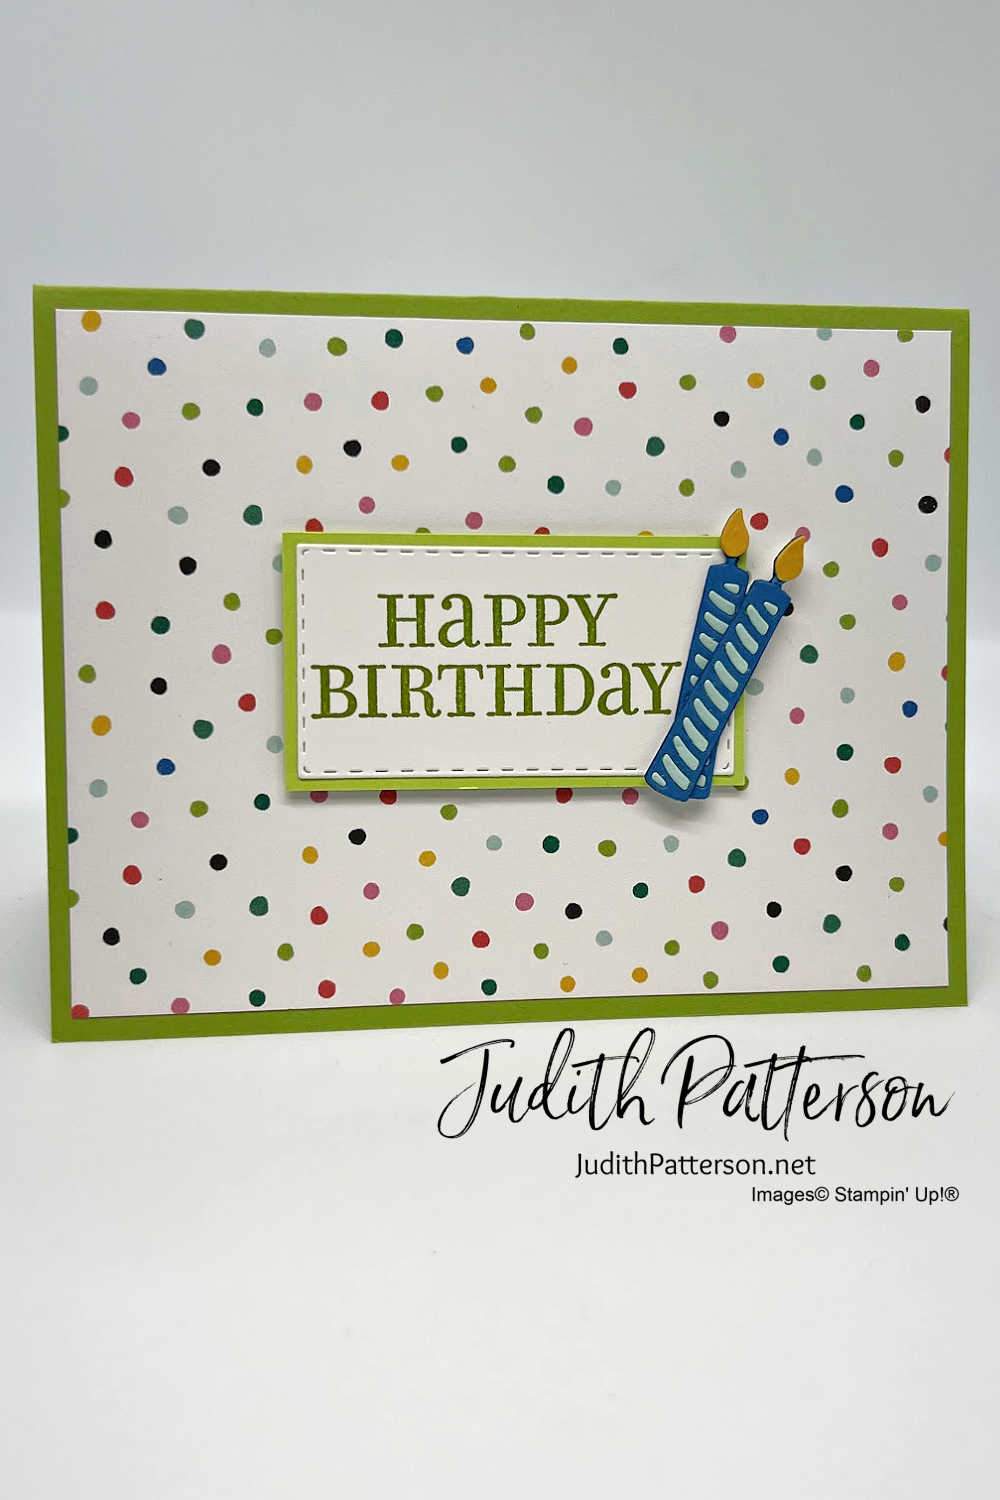
Stampin' Up!'s Celebrate with Tags stamps and coordinating Celebration Tags Dies were used to create this birthday card.  The layout was inspired by The Paper Players Sketch Challenge: PP619.  At first glance this is a fairly simple sketch, and while I did chose to keep most of my card pretty simple, this sketch has endless possibilities!  Be sure to swing by the challenge post on their blog to see all the other amazing cards created from this simple sketch.


So, this is one of those instances where I had a thing on my brain and just needed to make it happen before other things could happen.  You see, I really wanted to use this candle die from Celebration Tags Dies to do some paper piecing to create a multicolored candle.  It was a little time consuming, which is why I kept the rest of my card so very simple.  I am pleased with the results, and have a few tips. ๐Ÿ˜‰

  1. Use the die (it makes two candles) to cut scraps of Pool Party Cardstock and Pacific Point Cardstock.  Use it again to cut the flames from Crushed Curry Cardstock.  Place a bit of adhesive (I used Liquid Glue, but next time with use Stampin' Seal) on a piece of white cardstock...attach the Pacific Point Candles, after poking out the middles.
  2. This is the tedious part...fill in the spaces with the small Pool Party pieces.  Then, glue the Crushed Curry flames on the candles.  (The Take Your Pick Tool makes this step SO much easier!)
  3. Fussy cut around the candles, being super careful around the flames. I didn't like the white bits showing from under the candles SO...
  4. I used Stampin' Write Markers, the brush tip, to go around the edges of the candles.  (Another option would be to use Pacific Point Cardstock to glue everything to, but I didn't think about that until just now)


MEASUREMENTS
Card Base ~ Granny Apple Green Cardstock ~ 8-1/2" x 5-1/2", score at 4-1/4"
Layer 1 ~ Celebrate Everything DSP ~ 4" x 5-1/4"
Layer 2 ~ Granny Apple Green Cardstock ~ 1-1/2" x 2-3/4"
Layer 3 ~ Basic White Cardstock ~ at least 1-1/2" x 2-3/4"
Scraps of Basic White, Pool Party, Pacific Point and Crushed Curry Cardstocks


Thanks so much for visiting my blog today!  Happy Stamping! 


 I sent out my eighth 12 Weeks of Christmas Project Tutorial to all my mailing list subscribers last Friday!  ๐Ÿ˜ฎ๐ŸŽ„ Christmas will be here before we know it!

What is this?  It's an email I will be sending out every Friday between now and Christmas 
(only a handful of weeks away!)
that will contain a Christmas Project Tutorial.  
The tutorial might be anything from a card, to a gift box, small gift idea, to a tag!  

Sign up before Friday, December 2nd, to get the remaining  tutorials.  
This is just my way saying thank you for being part of my emailing list!
(When you sign up for my mailing list, you are also agreeing to get my newsletter...you can unsubscribe at any time)

PRODUCT LIST
Click on any of the photos below to go straight to that item in my online store.
During the month of November 2022, please use Host Code Q2WPGX3S on orders under $150.  
Thank you!


Tuesday, November 29, 2022

Stampin' Up! Celebrate with Tags ~ Card (& Tag) from the Catalog


Hi!  I hope you had a wonderful Thanksgiving weekend surrounded by friends and family!  (If you aren't in the US, I still hope you had a wonderful weekend!)

This week I'm focusing on Stampin' Up!'s Celebrate with Tags stamps.  The sentiments in this set check off the things I look for in a sentiment perfectly 1) beautiful fonts ✔ 2) easy to read ✔  3) great sizes ✔ 4) many occasions (not specific to one holiday, or too unusual) ✔ 
The images are also perfectly sized for using on tags, or combining with elements from other stamps or designer series paper...I really need to use those hearts for a background stamp!


CARD MEASUREMENTS
Card Base ~ Cherry Cobbler Cardstock ~ 8-1/2" x 5-1/2", score at 4-1/4"
Layer 1 ~ Kraft Paper ~ 4" x 5-1/4"
Layer 2 ~ Cherry Cobbler Cardstock ~ at least 2-1/2" x 6"
Scraps of Pool Party Cardstock for snowflakes
Basic White Cardstock Scraps for mittens and sentiment


TAG MEASUREMENTS
Tag ~ Pool Party Cardstock ~ At least 3" x 7-3/4"
Inside piece ~ Celebrate Everything DSP ~ 2" x 3"
Scraps of Basic White Cardstock 


Would you like to watch my YouTube Tutorial for this card and tag? Here it is๐Ÿ ‹

Well that's embarrassing, I misspelled 'Celebrate' on my video cover! ๐Ÿ˜ณ

Happy Stamping!


 I sent out my eighth 12 Weeks of Christmas Project Tutorial to all my mailing list subscribers last Friday!  ๐Ÿ˜ฎ๐ŸŽ„ Christmas will be here before we know it!

What is this?  It's an email I will be sending out every Friday between now and Christmas 
(only a handful of weeks away!)
that will contain a Christmas Project Tutorial.  
The tutorial might be anything from a card, to a gift box, small gift idea, to a tag!  

Sign up before Friday, December 2nd, to get the remaining  tutorials.  
This is just my way saying thank you for being part of my emailing list!
(When you sign up for my mailing list, you are also agreeing to get my newsletter...you can unsubscribe at any time)

PRODUCT LIST
Click on any of the photos below to go straight to that item in my online store.
During the month of November 2022, please use Host Code Q2WPGX3S on orders under $150.  
Thank you!

Saturday, November 26, 2022

Stampin' Up! Sit Stay Relax ~ Missing You Card


I have been using Sit Stay Relax stamps by Stampin' Up! pretty much all week.  It turns out they are so much more versatile than you might think on first glance.  However, I realized that most of the week I have been using sentiments from other sets.  So, I decided that for this last card with this set I would stick to just stamps from this stamp set.  


My favorite part about this card is the snow white cat lounging on the chair.  To really make the cat pop, I stamped it on a small scrap of Basic White Cardstock, then fussy cut as close around it as possible.  After fussy cutting, I used the brush tip of my Stampin' Write Marker (NOT Stampin' Blend) to go around the edge of the cat.  Then I used a tiny bit of Liquid Glue to adhere it to the chair. 


MEASUREMENTS
Card Base ~ Crushed Curry Cardstock ~ 8-1/2" x 5-1/2", score at 4-1/4"
Layer 1 ~ Rustic Harvest DSP ~ 4-1/4" x 5-1/2"
Layer 2 ~ Basic White Cardstock ~ 3-1/4" x 3-1/4"
Layer 3 ~ Garden Green Cardstock ~ 3" x 3"
Scraps of Basic White and Basic Black

Happy Stamping!


 I sent out my eighth 12 Weeks of Christmas Project Tutorial to all my mailing list subscribers yesterday!  ๐Ÿ˜ฎ๐ŸŽ„ Christmas will be here before we know it!

What is this?  It's an email I will be sending out every Friday between now and Christmas 
(only a handful of weeks away!)
that will contain a Christmas Project Tutorial.  
The tutorial might be anything from a card, to a gift box, small gift idea, to a tag!  

Sign up before Friday, December 2nd, to get the remaining  tutorials.  
This is just my way saying thank you for being part of my emailing list!
(When you sign up for my mailing list, you are also agreeing to get my newsletter...you can unsubscribe at any time)

PRODUCT LIST
Click on any of the photos below to go straight to that item in my online store.
During the month of November 2022, please use Host Code Q2WPGX3S on orders under $150.  
Thank you!

Friday, November 25, 2022

Stampin' Up!'s Sit Stay Relax ~ Fun Book Fold


I've always though Book Fold cards looked so fun and easy to create, but I'm not sure I've ever made one...until now!  Turns out I was right, they are fun and SO easy!  One of the things I like about them is you can create a square design, then place it on a standard card front.  Genius!  (I don't like putting square cards in rectangle envelopes...I'm weird that way)


I'm also weirdly excited about my little pot of flowers on this card.  I wanted a pot that was smaller than my chair, but couldn't think of anything I had on hand.  Then, I thought about this little stamp from Nothing's Better Than...it's perfect!  Especially when paired with flowers from Cup of Tea stamps.  


I added three simple hearts, using the heart trio die from Teacup Dies.  This is such an easy way to dress up the inside of a card. 


MEASUREMENTS
Card Base ~ Night of Navy Cardstock ~ 11" x 4-1/4", score at 5-1/2" and 4-1/4"
Layer 1 ~ Lovely Linen DSP ~ 2-1/4" x 4-1/4"
Scraps of Basic White & Polished Pink CS
Inside Layer ~ Basic White Cardstock ~ 4" x 4"

Watch my YouTube Tutorial for this card ๐Ÿ ‹

Happy Stamping!


 I sent out my eighth 12 Weeks of Christmas Project Tutorial to all my mailing list subscribers this morning!  ๐Ÿ˜ฎ๐ŸŽ„ Christmas will be here before we know it!

What is this?  It's an email I will be sending out every Friday between now and Christmas 
(only a handful of weeks away!)
that will contain a Christmas Project Tutorial.  
The tutorial might be anything from a card, to a gift box, small gift idea, to a tag!  

Sign up before Friday, December 2nd, to get the remaining  tutorials.  
This is just my way saying thank you for being part of my emailing list!
(When you sign up for my mailing list, you are also agreeing to get my newsletter...you can unsubscribe at any time)

PRODUCT LIST
Click on any of the photos below to go straight to that item in my online store.
During the month of November 2022, please use Host Code Q2WPGX3S on orders under $150.  
Thank you!


Thursday, November 24, 2022

Stampin' Up! Penguin Place ~ Ink & Inspiration Blog Hop


Hey Stampers & Friends!  Welcome to the Ink & Inspiration Blog Hop.  I'm excited to be part of this fun and creative group sharing stamping ideas with you today!


This month's color & inspiration challenges come from the photo below.  I got a little confused with this Blog Hop, thinking it was due last week, so I used my Stamp of the Week for last week, Penguin Place to create my card.  I have to admit, it was stumping me a bit, at first, when I was just looking at the color part of the challenge.  But then...I took a better look at the PHOTO...and inspiration struck!


I love the sunset, landscape and colors, basically everything, about this picture.  I'm naturally more of a beach girl, but my husband loves the mountains, so I have learned to love this type of landscape, too.  Since it's been a bit chillier here the past week or so, I thought about what this might look like in the winter.   


I started by stamping the hills with Orchid Oasis and Fresh Freesia inks.  Then, I stamped the trees, stamping twice before reinking.  Blending Brushes were then used to add the colors for the sunset.  After stamping the sentiment, I applied a THIN layer of Snowfall Accent Puff Paint to each 'hill' and used my Heat Tool to set it.  I didn't want it to puff up too much, which is why I kept it to a very small amount.  I love the way it turned out, even picking up the ink a bit.


Happy Stamping! 

Follow the links below to visit all the other blogs in this blog hop for even stamping inspiration.

BLOG HOP LIST


 I sent out my seventh 12 Weeks of Christmas Project Tutorial to all my mailing list subscribers last Friday!  Time is FLYING by!

What is this?  It's an email I will be sending out every Friday between now and Christmas 
(only a few weeks away!)
that will contain a Christmas Project Tutorial.  
The tutorial might be anything from a card, to a gift box, small gift idea, to a tag!  

Sign up before Friday, November 25th, to get the remaining  tutorials.  
This is just my way saying thank you for being part of my emailing list!
(When you sign up for my mailing list, you are also agreeing to get my newsletter...you can unsubscribe at any time)

PRODUCT LIST
Click on any of the photos below to go straight to that item in my online store.
During the month of November 2022, please use Host Code Q2WPGX3S on orders under $150.  
Thank you!

Wednesday, November 23, 2022

Stampin' Up! Sit Stay Relax ~ Small Slimline Card


The images in Sit Stay Relax stamps by Stampin' Up! are perfect for fussy cutting.  They are simple and quick to trim around with Paper Snips.  I love that you can stamp them and that be it, or add a little detail, like I did on this chair.  For the legs and other bits of chair that might be wood, I used the Dark Soft Suede Stampin' Blend.


The fun lamp is from Caroling Mice, the host set from the 2022 July-December Mini Catalog.  I stamped it directly on the Basic White Cardstock, then used Stampin' Blends to color.  The chair was attached with Stampin' Dimensionals. 

The Basic Rhinestones under the sentiment were colored with the Dark Daffodil Delight Stampin' Blend.   


MEASUREMENTS
Card Base ~ Shaded Spruce Cardstock ~ 6-1/4" x 6-1/2", score at 3-1/4"
Layer 1 ~ Boughs of Holly DSP ~ 2-1/4" x 6-1/4"
Layer 2 ~ Basic White Cardstock ~ 5-1/4" x 2-3/4"
Scrap of Basic White Cardstock 

Happy Stamping!


 I sent out my seventh 12 Weeks of Christmas Project Tutorial to all my mailing list subscribers last Friday!  Time is FLYING by!

What is this?  It's an email I will be sending out every Friday between now and Christmas 
(only a few weeks away!)
that will contain a Christmas Project Tutorial.  
The tutorial might be anything from a card, to a gift box, small gift idea, to a tag!  

Sign up before Friday, November 25th, to get the remaining  tutorials.  
This is just my way saying thank you for being part of my emailing list!
(When you sign up for my mailing list, you are also agreeing to get my newsletter...you can unsubscribe at any time)

PRODUCT LIST
Click on any of the photos below to go straight to that item in my online store.
During the month of November 2022, please use Host Code Q2WPGX3S on orders under $150.  
Thank you!

Tuesday, November 22, 2022

Stampin' Up!'s Sit Stay Relax ~ Cards from the Catalog


Even though Stampin' Up!'s Sit Stay Relax Stamp Set includes sentiments along the lines of 'Missing you' and 'Wish you were here', the images are perfect for combining with sentiments from other sets for a wide array of occasions! 

Both of the cards in today's post were inspired by Cards from the Catalog, both of the originals can be found on p. 179 of the 2022-2023 Annual Catalog.  


I was really having fun with this Rose Gold, Shaded Spruce and Cherry Cobbler color combination!  I think it's a perfect classic Christmas color combination, so couldn't resist using Christmas sentiments from other stamp sets on my versions of these cards.  Also, as you will see if you watch my YouTube Tutorial for these cards, the circles are very forgiving and don't necessarily have to match the originals exactly.  

MEASUREMENTS (circle card)
Card Base ~ Shaded Spruce Cardstock ~ 8-1/2" x 5-1/2", score at 4-1/4"
Background Circles ~ Rose Gold Metallic Specialty Paper ~ 1-1/2" x 1-1/2", 2-1/2" x 2-1/2", 2-3/4" x 2-3/4"
Stamped Circles ~ Basic White Cardstock ~ 3-1/4" x 3-1/4", 2-3/4" x 2-3/4", 2" x 2" 


MEASUREMENTS
Card Base ~ Shaded Spruce Cardstock ~ 8-1/2" x 5-1/2", score at 4-1/4"
Layer 1 ~ Rose Gold Metallic Specialty Paper ~ 3-1/2" x 4-1/4"
Layer 2 ~ Basic White Cardstock ~ 4-3/4" x 2-1/2"
Layer 3 ~ Cherry Cobbler Cardstock ~ 3/4" x 3"


Watch my YouTube Tutorial for these cards ๐Ÿ ‹

Happy Stamping!


 I sent out my seventh 12 Weeks of Christmas Project Tutorial to all my mailing list subscribers last Friday!  Time is FLYING by!

What is this?  It's an email I will be sending out every Friday between now and Christmas 
(only a few weeks away!)
that will contain a Christmas Project Tutorial.  
The tutorial might be anything from a card, to a gift box, small gift idea, to a tag!  

Sign up before Friday, November 25th, to get the remaining  tutorials.  
This is just my way saying thank you for being part of my emailing list!
(When you sign up for my mailing list, you are also agreeing to get my newsletter...you can unsubscribe at any time)

PRODUCT LIST
Click on any of the photos below to go straight to that item in my online store.
During the month of November 2022, please use Host Code Q2WPGX3S on orders under $150.  
Thank you!

Friday, November 18, 2022

Stampin' Up! Penguin Place Christmas Card


Penguin Place really does make adorable cards.  This was a super fun one to put together.  I know, I say that a LOT!  But it's TRUE!  At least, it is for me.  I love it when a card just comes together and is stinkin' adorable, too.  There's a lot of great elements to this card, nothing difficult.  I did find there is a bit of a trick to using the Very Best Trio Punch.  You may have already figured it out, but if not, be sure to watch my YouTube Tutorial for this card. 


It's true, you can just stamp the penguin feet right on their little bodies...but the punch is so perfect for this, I can't resist the extra bit of dimension it adds.  The hat and bow have to be fussy cut, but they are so small, it's super quick to get them both done. 


MEASUREMENTS
Card Base ~ Night of Navy Cardstock ~ 11" x 4-1/4", score at 5-1/2"
Layer 1 ~ Cherry Cobbler Cardstock ~ 2-1/2" x 3-1/2"
Basic White Cardstock ~ approx. 2" x 5"
Inside Layer ~ Basic White Cardstock ~ 4" x 5-1/4"

Here's a handy link to my YouTube Tutorial for this card

Happy Stamping!


 I sent out my seventh 12 Weeks of Christmas Project Tutorial to all my mailing list subscribers this morning!

What is this?  It's an email I will be sending out every Friday between now and Christmas 
(only 6 weeks away!)
that will contain a Christmas Project Tutorial.  
The tutorial might be anything from a card, to a gift box, small gift idea, to a tag!  

Sign up before Friday, November 18th, to get the remaining  tutorials.  
This is just my way saying thank you for being part of my emailing list!
(When you sign up for my mailing list, you are also agreeing to get my newsletter...you can unsubscribe at any time)

PRODUCT LIST
Click on any of the photos below to go straight to that item in my online store.
During the month of November 2022, please use Host Code Q2WPGX3S on orders under $150.  
Thank you!


Thursday, November 17, 2022

Stampin' Up! Swaps from OnStage 2022 (Arlington, TX)


Here are just a few of the Christmas Cards I received when swapping at Stampin' Up!'s OnStage event in Arlington, TX last weekend.  This was the first event I have attended in person and swapped at. It was SO much fun and I'm looking forward to doing it again someday!


This first card was created by Tracy Walker and features Stampin' Up!'s Trees for Sale stamp set.  I feel like I'm missing a little something, because I haven't yet figured out what set the stars are from!  I love they way she used them on the card, and again on the envelope flap.  I do wonder if they are a mask?  If you know, would you please let me know in the comments!? 


This next card was created by Socorro Gonzalez-Brey.  Isn't it lovely!?  She used the Painted Christmas Designer Series Paper and Stampin' Up!'s Cottage Wreaths Bundle to create this one.  I love the way the top flap overlaps with the bottom flap.  I might be casing this fold in the future! :)


This final card, created by D'Ann Whittle, uses one of my favorite stamp sets, Kindest Gnomes!  She also chose to use the EXACT piece of Celebrate Everything Designer Series Paper that I used for my swap.  This is a fun, simple layout, perfect for swapping! 

Thanks for looking!  (I'm sharing more swaps in my YouTube Video tomorrow)

Happy Stamping!


 I sent out my sixth 12 Weeks of Christmas Project Tutorial to all my mailing list subscribers last Friday!

What is this?  It's an email I will be sending out every Friday between now and Christmas 
(only 6 weeks away!)
that will contain a Christmas Project Tutorial.  
The tutorial might be anything from a card, to a gift box, small gift idea, to a tag!  

Sign up before Friday, November 18th (TOMORROW), to get the remaining  tutorials.  
This is just my way saying thank you for being part of my emailing list!
(When you sign up for my mailing list, you are also agreeing to get my newsletter...you can unsubscribe at any time)

PRODUCT LIST
Click on any of the photos below to go straight to that item in my online store.
During the month of November 2022, please use Host Code Q2WPGX3S on orders under $150.  
Thank you!

Wednesday, November 16, 2022

Stampin' Up! Penguin Place ~ Christmas Card


Hey there! In yesterday's YouTube Card Tutorial I mentioned that I would be sharing my swap from last weekend's Stampin' OnStage.  Whelp, here it is!  :)  I had so much fun creating this card, and using my Stamparatus to quickly create 17 more of it.  Then, it was even more fun to get to OnStage and 'swap' it with other demonstrators for their amazing cards and creations.  (I'll share more of those in my YouTube Card Tutorial Friday)


Isn't this Celebrate Everything Designer Series Paper fun!?  I used both sides of one sheet for my card.  Funny side note ~ one of the cards I swapped for has the same DSP sheet on it, with Kindest Gnomes stamps instead of Penguin Place (and a totally different layout.)


For the inside, I used a slightly smaller than normal piece of Basic White Cardstock, since the front of this card is narrower than normal.  If I were to do it again, I think I would place a 1/4" strip of the snowflake side of the DSP against the Basic White.  What do you think? 


MEASUREMENTS
Card Base ~ Shaded Spruce Cardstock ~ 8" x 5-1/2", score at 4-1/4"
Layer 1 ~ Celebrate Everything DSP ~ 3-1/4" x 5-1/2" and 1/" x 5-1/2"
Layer 2 ~ Shaded Spruce Cardstock ~ 2-1/2" x 4"
Layer 3 ~ Basic White Cardstock ~ 2-1/4" x 3-3/4"
Inside Layer ~ Basic White Cardstock ~ 3-1/2" x 5-1/4"

Happy Stamping!


 I sent out my sixth 12 Weeks of Christmas Project Tutorial to all my mailing list subscribers last Friday!

What is this?  It's an email I will be sending out every Friday between now and Christmas 
(only 6 weeks away!)
that will contain a Christmas Project Tutorial.  
The tutorial might be anything from a card, to a gift box, small gift idea, to a tag!  

Sign up before Friday, November 18th, to get the remaining  tutorials.  
This is just my way saying thank you for being part of my emailing list!
(When you sign up for my mailing list, you are also agreeing to get my newsletter...you can unsubscribe at any time)

PRODUCT LIST
Click on any of the photos below to go straight to that item in my online store.
During the month of November 2022, please use Host Code Q2WPGX3S on orders under $150.  
Thank you!

Tuesday, November 15, 2022

Stampin' Up! Penguin Place ~ Card from the Catalog


The original version of this week's Card from the Catalog does not actually use my Stamp Set of the Week, Penguin Place.  When you find the original, on p. 35 of the 2022 July-December Mini Catalog, you will see Seal of Approval was used to create it.  However, I thought it was a great layout for this fun penguin and all her accessories!  


The only die needed for this card is the Picture This Die with all the circles.  Even the sentiment was cut out with this one die.  If you leave of the antlers, this card goes together really pretty quickly.  (The antlers only take an extra few minutes to fussy cut!)


MEASUREMENTS
Card Base ~ Pool Party Cardstock ~ 11" x 4-1/4", score at 5-1/2"
Layer 1 ~ Basic White Cardstock ~ 3-1/2" x 4-3/4"
Layer 2 ~ Subtles DSP ~ 3-3/4" x 5"
Scrap of Basic White Cardstock for Penguin and Antlers
Scrap of Pear Pizzazz Cardstock, at least 2" x 2"
Inside layer is 4" x 5-1/4" with a DSP strip 1/4" x 5"

Watch my YouTube Tutorial for this card ๐Ÿ ‹

Happy Stamping!


 I sent out my sixth 12 Weeks of Christmas Project Tutorial to all my mailing list subscribers last Friday!

What is this?  It's an email I will be sending out every Friday between now and Christmas 
(only 6 weeks away!)
that will contain a Christmas Project Tutorial.  
The tutorial might be anything from a card, to a gift box, small gift idea, to a tag!  

Sign up before Friday, November 18th, to get the remaining  tutorials.  
This is just my way saying thank you for being part of my emailing list!
(When you sign up for my mailing list, you are also agreeing to get my newsletter...you can unsubscribe at any time)

PRODUCT LIST
Click on any of the photos below to go straight to that item in my online store.
During the month of November 2022, please use Host Code Q2WPGX3S on orders under $150.  
Thank you!