Saturday, October 30, 2021

Stampin' Up! Sweet Little Stockings Bundle


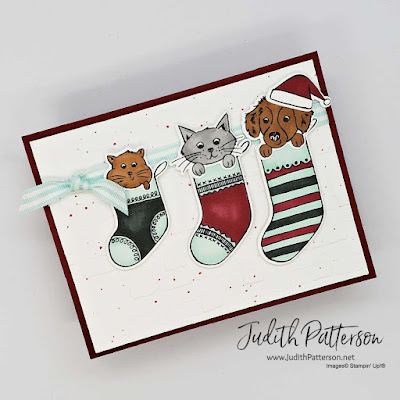
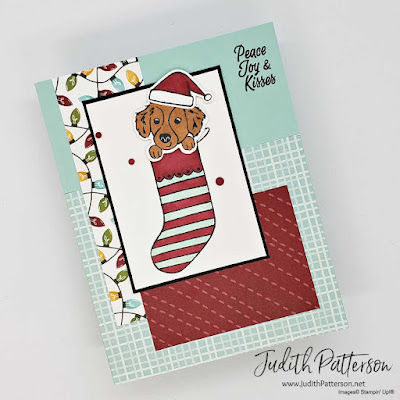
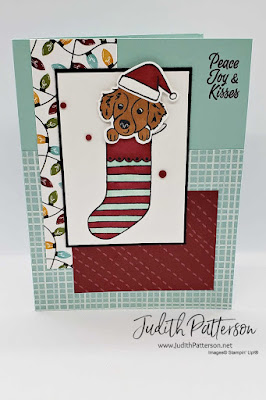
Stampin' Up!'s Sweet Little Stockings Bundle is so easy to create Christmas cards with that I couldn't resist using it again today!  I love that not only the stamps and dies in the bundle coordinate so well, so do the Sweet Stockings Designer Series Paper and Matte Decorative Dots. The possibilities are endless when you add just a few Stampin' Blends, Tuxedo Black Memento ink pad and two or three solid colors of coordinating cardstock! 

MEASUREMENTS
Card Base ~ Pool Party Cardstock ~ 8-1/2" x 5-1/2", score at 4-1/4"
Layer 1 ~ Sweet Stockings DSP ~ 4-1/4" x 3-1/2"
Layer 2 ~ Sweet Stockings DSP ~ 1-1/2" x 4-1/2"
Layer 3 ~ Sweet Stockings DSP ~ 3" x 2-1/2"
Layer 4 ~ Basic Black Cardstock ~ 2-1/2" x 3-1/2"
Layer 5 ~ Basic White Cardstock ~ 2-3/8" x 3-3/8"
scraps of Basic White Cardstock for the puppy and hat

Inside Layer 1 ~ Sweet Stockings DSP ~ 1/2" x 4"
Inside Layer 2 ~ Basic White Cardstock ~ 3-3/4" x 4"

  • Once you have all your pieces cut...
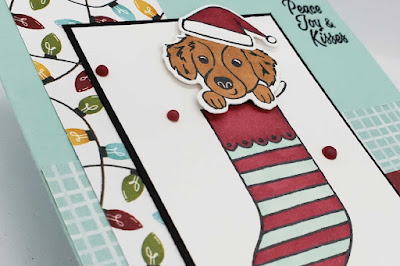
  • Use Tuxedo Black Memento ink to stamp the stocking on Layer 5 and the puppy and hat on Basic White scraps
  • Color the images with Stampin' Blends
  • Use the coordinating Stockings Dies to cut out the puppy and hat.  Then, attach them to Layer 5, above the stocking, with Stampin' Dimensionals
  • Stamp the sentiment in the top right corner with Tuxedo Black Memento ink
  • Use Liquid Glue to adhere the layers to the card front, as shown, starting with Layer and working up to Layer 5
  • Add a few Matte Decorate Dots

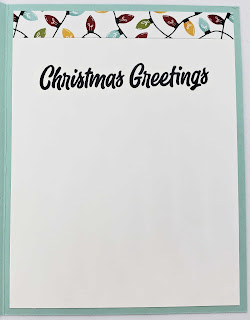
For the inside, stamp the sentiment on the top center of the Basic White CS.  Use Liquid Glue, to attach the DSP and the Basic White inside the card, as shown. 


Thank you for visiting my blog today.  
You can click any of the images below to go straight to my online shop & begin your order.
I would L♥VE to be your Stampin' Up! Demonstrator!

Happy Stamping!

PRODUCT LIST
Please use Host Code XT6KHPRZ when placing orders under $150 during the month of October 2021.


Friday, October 29, 2021

Stampin' Up! Holly Jolly Wishes - Card from the Catalog


This week's Card From the Catalog comes from the 2021-2022 Annual Catalog, and can be found on p. 119.  This time, I changed practically everything about the card!  I don't have the Handmade for You stamp set they used for the catalog card, the Animal Print Embossing Folder, OR the Shaker Shapes embellishments.  (I probably NEED all those things, right!?)  What I did have was a small scrap of Whimsy & Wonder Specialty Designer Series Paper that I wanted to use for the background piece AND a stamp from Holly Jolly Wishes that I hadn't used yet.  So, that was my starting point. 

MEASUREMENTS
Card Base ~ Night of Navy Cardstock ~ 8-1/2" x 5-1/2", score at 4-1/4"
Layer 1 ~ Basic White Cardstock ~ 3-1/4" x 4-1/2"
Layer 2 ~ Whimsy & Wonder SDSP ~ 2-3/4" x 3/8"
Shaded Spruce Cardstock ~ scrap at least 2-1/4" x 1-3/8"
Inside Layer ~ Basic White Cardstock ~ 4" x 5-1/4"

  • Use a Blending Brush to add a layer of Night of Navy ink to the lower right corner of Layer 1
  • Splatter some Night of Navy ink on Layer 1 with a Water Painter
  • On the scrap of Shaded Spruce CS, stamp the sentiment with Versamark, cover it with Silver Embossing Powder, tap of the excess and set with the Heat Tool
  • Trim around the sentiment with Paper Snips or a Paper Trimmer
  • Attach Layer 1 to the front of the card with Stampin' Dimensionals
  • Use Liquid Glue to adhere the DSP strip to Layer 1
  • Attach the sentiment with Stampin' Dimensionals
  • Add a few Red Rhinestone Basic Jewels around the sentiment

For the inside of the card, stamp 'Merry Christmas' on the Basic White layer, then use Liquid Glue to adhere it. 


Thanks for visiting my blog!  I hope you are inspired to create something wonderful!

Happy Stamping! 

Click here to watch my YouTube video


PRODUCT LIST
Please use Host Code XT6KHPRZ when placing orders under $150 during the month of October 2021.


Wednesday, October 27, 2021

Stampin' Up! Whimsy & Wonder Boxes


These boxes are so easy to make and can hold a gift card, fun size chocolate/candy, or other small gifts.  
I used Whimsy & Wonder Specialty Designer Series Paper to create the bands around the boxes.  I love this SDSP because it is quite beautiful and can be used for just about any occasion.  


Begin by cutting the pieces for the boxes.  The 'drawer' piece can be a solid color of cardstock, so you can get more boxes from your Designer Series Paper.  The band piece is the part that wraps around your drawer, it should be a piece of that beautiful DSP. :)


Cut a mat for the top of the box that matches the drawer.  It should measure 3-3/8" x 2". 
Use a Stitched Rectangle Die to cut out the piece to go on top of the mat. 

I used Holly Jolly Sentiments for the sentiments on both boxes. Then, I used a snowflake from Stitched Snowflakes Dies to cut a small snowflake with Silver Specialty Paper.  Use Stampin' Dimensionals to attach the snowflake.  For the other box, I stamped the holly from Whimsical Trees and colored it with blends.  Then, I used the coordinating die from Christmas Trees Dies to cut it out.  Finish decorating the top of both boxes by adding some Metallic Pearls. 

 Use a couple of Glue Dots to attach a 1-1/4" piece of ribbon on the drawer to make a little drawer pull.  Only attach the ends of the ribbon to the drawer so that you have enough ribbon sticking up to hold when opening the drawer.  (This part is optional, you can just push the drawer open with your finger.)


Thanks for visiting my blog!  I hope you are inspired to create something wonderful!

Happy Stamping! 

Click here to watch my YouTube video


PRODUCT LIST
Please use Host Code XT6KHPRZ when placing orders under $150 during the month of October 2021.


Monday, October 25, 2021

Stampin' Up! Joyful Life card


Stampin' Up!'s Joyful Life stamp set makes me smile.  I love all the images and sentiments in it, but my favorite is the bear and bunny on a bike!  They truly look like they are having a great time.  I find that changing the colors is one way to keep this fun and fresh, since I find myself using this set a lot!  


This fun card was inspired by Sketch Challenge 529 at Try Stampin' On Tuesday's blog.
Will you create a card with this sketch as your inspiration? 


MEASUREMENTS
Card Base ~ Smoky Slate Cardstock ~ 8-1/2" x 5-1/2", score at 4-1/4"
Layer 1 ~ Basic White Cardstock ~ 3-3/4" x 4-1/4"
Layer 2 ~ Balmy Blue Cardstock ~ 1-1/4" x 4-1/4"
Scrap of Pumpkin Pie Cardstock 
Inside Layer ~ Basic White Cardstock ~ 4" x 5-1/4"

  • Use Tuxedo Black Memento Ink to stamp the bear, bunny and bicycle on Layer 1
  • Color the image with Stampin' Blends - I used Mint Macaron, Flirty Flamingo, Smoky Slate, Balmy Blue and Pumpkin Pie
  • Create a scalloped edge on Layer 2 with the edge die from Scalloped Contours Dies.  
  • Stamp 'You Make Life a Joy' on the scrap of Pumpkin Pie CS.  Trim around it with Paper Snips
  • Use Stampin' Dimensionals to attach Layer 2 behind Layer 1, as shown
  • Adhere the layers to the card base by gluing Layer 2 and adding Dimensionals to Layer 1
  • For the sentiment, add a touch of liquid glue behind 'you' and a Stampin' Dimensional, cut in half, behind 'joy'.  Then attach the card. 

For the inside, make sure your stamp is completely clean.  Then, stamp only the bunny in the basket on the edge of the inside layer.  Color with Stampin' Blends.   Adhere to the inside of the card with your favorite adhesive. 


Thank you for visiting my blog today.  
You can click any of the images below to go straight to my online shop & begin your order.
I would L♥VE to be your Stampin' Up! Demonstrator!

Happy Stamping!

PRODUCT LIST
Please use Host Code XT6KHPRZ when placing orders under $150 during the month of October 2021.


Saturday, October 23, 2021

Stampin' Up! Sweet Little Stockings Christmas Card ~ Sketch Saturday


Sketch Saturday's sketch this week made me think of these adorable stockings and pets from Stampin' Up!'s Sweet Little Stockings Bundle.  Aren't they cute!?  I love this stamp set for creating cards for all my animal loving friends and family.  One of my favorite things about this bundle is that almost all of the images from the stamp set have coordinating dies!

What can you do with this sketch?  Head over to Sketch Saturday to enter your card in the challenge list.  We would love to see your creativity!


MEASUREMENTS
Card Base ~ Cherry Cobbler Cardstock ~ 8-1/2" x 5-1/2", score at 4-1/4"
Layer 1 ~ Basic White Cardstock ~ 4" x 5-1/4"
Scraps of Basic White Cardstock for the critters and stockings 
(OR all of them will fit on a 4-1/4" x 5-1/2" piece)
Inside Layer ~ Basic White Cardstock ~ 4" x 5-1/4"

  • Use Tuxedo Black Memento ink to stamp the three stockings, three critters and 1 Santa hat
  • Color the stamped images with your favorite coloring tool...I used Stampin' Blends
  • Use the Stockings Dies to cut out each of the images. 
  • Emboss Layer 1 with the Brick & Mortar 3D Embossing Folder
  • Glue the critters to the stockings as shown, adding the hat to the puppy
  • Splatter a bit of Cherry Cobbler ink on Layer 1.  My favorite way to do this is by dabbing a bit of ink on the tip of a Water Painter, squeezing plenty of water onto the tip and tapping it over the cardstock. 
  • Place a Glue Dot on each end of a 5-3/4" piece of ribbon, securing the ends behind Layer 1
  • Tie a faux bow around the ribbon, as shown.  (I also used another Glue Dot behind the faux bow to hold it in place
  • Use Stampin' Dimensionals to attach Layer 1 to the front of your card. 
  • Attach the stockings and critters to the front of the card, as shown, with Stampin' Dimensionals. 

For the inside, use Cherry Cobbler ink to stamp the sentiments.  Then, stamp the gift box with Tuxedo Black Memento ink and color in the box.  Attach the inside layer to the inside of your card with your favorite adhesive (I used Liquid Glue). 


Thank you for visiting my blog today.  
You can click any of the images below to go straight to my online shop & begin your order.
I would L♥VE to be your Stampin' Up! Demonstrator!

Happy Stamping!

PRODUCT LIST
Please use Host Code XT6KHPRZ when placing orders under $150 during the month of October 2021.


Friday, October 22, 2021

Stampin' Up!'s Merry Snowflakes - Card from the Catalog


Hi.  Welcome to my blog!  Today's card is one I CASE'd from Stampin' Up!'s July-December 2021 Mini Catalog.  You can find it on p. 13.  The catalog version of this card uses Misty Moonlight Cardstock and ink.  It also uses Brushed Gold Metallic Specialty Paper and Wonderful Gems.  I chose to use Night of Navy Cardstock and ink for my card, with Silver Foil Specialty Paper and Rhinestone Basic Jewels.  

MEASUREMENTS
Card Base ~ Night of Navy Cardstock ~ 8-1/2" x 5-1/2", score at 4-1/4"
Layer 1 ~ Basic White Cardstock ~ 5-3/4" x 2"
Snowflakes ~ Silver Foil Specialty Paper* ~  2-1/2" x 6" (2 strips) - 
*IF you are using an Adhesive Sheet, I recommend placing it on the back of the Silver Foil before cutting it into strips.
Inside Layer ~ Basic White Cardstock ~ 4" x 5-1/4"

  1. Use a Blending Brush to add a layer of Nigh of Navy ink to Layer 1.  Make the middle darker and fade out to the edges.  Use the Heat Tool to dry the ink a bit. 
  2. Stamp 'Season's Greetings' with Versamark ink to the center of Layer 1.  Cover with white embossing powder, tap off the excess and set with the Heat Tool. 
  3. Cut out these snowflakes in silver, with the Stitched Snowflakes Dies and the Stampin' Cut & Emboss Machine. (The mini machine works great for this one) 
  4. Adhere the snowflakes to the card front as shown, by either peeling off the adhesive sheet backing or using Liquid Glue.  
  5. Place Stampin' Dimensionals on the back of Layer 1.  Place the left bottom corner along the left edge of the card and the right upper corner on the right edge of the card, as shown.  Turn the card over and trim off the extra Basic White CS that is hanging off the edge. 
  6. Add the Rhinestones, as shown. 

For the inside layer, add a light layer of Night of Navy ink to the corner with your Blending Brush.  Then, adhere the Basic White Cardstock to the inside of the card.  Finish by adhering the snowflake to the corner, over the Night of Navy. 


Thanks for visiting my blog!  I hope you are inspired to create something wonderful!

Happy Stamping! 

Click here to watch my YouTube video

PRODUCT LIST
Please use Host Code XT6KHPRZ when placing orders under $150 during the month of October 2021.


Wednesday, October 20, 2021

Stampin' Up! Sweets & Treats Birthday Card


Hello!  Welcome to my blog!  Did you catch my YouTube video yesterday?  In it, I demonstrated how to create this fun birthday card!  If you missed the video, there's a link included at the end of this post. 

The stamp set I used to create this card is the Sweets & Treats set, found in the July-December Mini Catalog.  I love this set because of the fun images and I like sets that can be used for more than one occasion.  This one is great for birthdays, Christmas, thank you's and I think it can be used for Valentine's day, too.

MEASUREMENTS
Card Base ~ Mint Macaron Cardstock ~ 8-1/2" x 5-1/2", score at 4-1/4"
Layer 1 ~ Basic White Cardstock ~ 3-3/4" x 5"
Layer 2 ~ Basic White Cardstock ~ 2-1/4" x 3-3/4"
Layer 3 ~ Hand-Penned Designer Series Paper ~ 1-1/4" x 3-3/4"
Inside ~ Basic White Cardstock ~ 4" x 5-1/4"
scraps of Basic White Cardstock 
scrap of Mint Macaron Cardstock 

  • Stamp six cupcakes on the scraps of Basic White Cardstock, using Tuxedo Black Memento ink
  • Color the cupcakes with Stampin' Blends
  • Use Paper Snips to fussy cut around each of the cupcakes and set aside
  • Stamp 'happy birthday' with Versamark ink on the scrap of Mint Macaron.  Cover with White Embossing Powder and set with the Heat Tool after tapping off any excess powder
  • Trim around the sentiment with Paper Snips
  • Use the Merry Melody Embossing Folder to emboss Layer 2
  • Attach Layers 2 & 3 to Layer 1 with your favorite adhesive (I like Liquid Glue)
  • Use that favorite adhesive again to attach Layer 1 to the Card Base
  • Place one Stampin' Dimensional on the back of each cupcake, in the middle.  Overlap the cupcakes as you place them on the card front, covering up the seam where Layers 2 & 3 meet.  
  • Put a Stampin' Dimensional behind 'birthday' and a dab of Liquid Glue behind 'happy'.  Then, attach the sentiment to the card front, as shown. 
  • Place a few In Color Jewels on the front of your card. 

For the inside layer, stamp another cupcake in the bottom corner and color to the match the front cupcakes.  Finish by attaching the inside layer to the inside of your card. 


Thanks for visiting my blog!  I hope you are inspired to create something wonderful!

Happy Stamping! 

Click here to watch my YouTube video

Don't miss Stampin' Up!'s 24 Hour Stamp Sale, Today (October 20, 2021) ONLY!  
Almost every Cling Stamp in the Annual Catalog is 15% for just 24 Hours. 
Shop online here


Products used on this project. 


Monday, October 18, 2021

Stampin' Up! Whimsical Trees Christmas Card


As You See It has a color challenge going on this week that I just couldn't resist!  Aren't these colors gorgeous together!?  (My photography skills just don't measure up to the greatness of this color combo)
As soon as I saw this challenge I knew I was going to make a card using these colors and Stampin' Up!'s Whimsical Trees.  


I love the larger sentiments in Holly Jolly Wishes, so decided to use one of those as my greeting.  I'm big on having great sentiments to choose from, so I love getting Stampin' Up!'s all sentiment stamp sets whenever possible.  
The ribbon is the white linen ribbon from the Flowers for Every Season Ribbon Combo.  I used a Dark Granny Apple Green Stampin' Blends to color it before adding the ribbon to the card.  
(I spent an embarrassingly long time trying to get that bow perfect...sometimes I get caught up in the little things.)


For the inside of this one, I stamped a little tree, then used my Dark Blackberry Bliss Stampin' Blends to add some decorations to the tree.  


I'm not sure how well you can see it in these photos, the ornaments on the large tree heat embossed with the Silver Embossing powder to add a little extra shine to the card. 


Thank you for visiting my blog today.  
You can click any of the images below to go straight to my online shop & begin your order.
I would L♥VE to be your Stampin' Up! Demonstrator!

Happy Stamping!


Saturday, October 16, 2021

Easy Card with Dragonfly Garden ~ Casually Crafting Blog Hop


Hi!  Welcome to my blog!  I'm so excited to be part of the Casually Crafting Design Team.  We are an international group of Independent Stampin' Up! Demonstrators who want to share our take on casual crafting.  We will share what we love with you monthly.  Be sure to check out the rests of the design team's projects using the links at the bottom of this post.


This month our Blog Hop Challenge was to create a card using the sketch below.  Sketch challenges are my favorite!  I am looking forward to seeing what everyone else did with the challenge. My card is simple and quick, using only one stamp set and three colors.  I did step it up a little on the inside, but that can easily be left off or simplified...I'll tell you how later. 


MEASUREMENTS
Card Base ~ Balmy Blue Cardstock ~ 8-1/2" x 5-1/2", score at 4-1/4"
Layer 1 ~ Shimmery White Cardstock ~ 4" x 5-1/4"
a scrap of Gold Metallic Specialty Paper
Inside Layer ~ Basic White Cardstock ~ 4" x 5-1/4"

  • Use the wide Water Painter brush to paint the background on Layer 1, starting with the lighter color.  For your ink pallet, either squeeze your closed ink pad, then open and use the lid OR ink an empty stamping block and use it. 
  • Punch a small Gold Metallic dragonfly
  • Once the paint is dry (you can use a Heat Tool to hurry along the drying process), stamp the flower image and sentiment with Tuxedo Black Memento ink.  
  • Adhere Layer 1 to the card base. 
  • Use Liquid Glue or a Glue Dot to attach the small dragonfly, as shown. 

I chose to add the small dragonflies to the inside Basic White layer with Versamark, Heat & Stick Powder and Gilded Leafing.  However, you can also stamp the dragonflies with Balmy Blue ink, or leave them off completely.  
Use Tuxedo Black Memento ink to stamp the sentiment.  Then, adhere the Basic White CS to the inside of your card. 
(Sorry this picture didn't turn out great...I had a hard time getting my camera to focus on this one) 


Thanks for stopping by my blog today.  Please feel free to ask me if you have any Stampin' Up! related questions. 
Don't forget to visit the other blogs in the Casually Crafting Design Tea Blog Hop. 

If you live in the USA and don't currently have someone you are working with, I would L♥VE to be your Stampin' Up! Demonstrator!

Happy Stamping! 

Blog Hop List


Product List

Optional Products 
(for the gold dragonflies inside the card)

Friday, October 15, 2021

Stampin' Up! Nothing's Better Than - Card from the Catalog


Hey hey it's Friday!  :)  This is my Card from the Catalog from this week.  I chose this one because I wanted to use the Gold Metallic Specialty Paper again today,  and because I like it!  However, I don't have the Bamboo Beauty stamp set that was used in the 2021-2022 Annual Catalog (p. 48), so I decided to use the Nothing's Better Than stamp set again.  (I used it in Tuesday's YouTube video, too) 

MEASUREMENTS
Card Base ~ Mint Macaron Cardstock ~ 8-1/2" x 5-1/4", score at 4-1/4"
Layer 1 ~ Gold Metallic Specialty Paper ~ approx. 3-1/2" x 2-1/4"
Layer 2 ~ Basic White Cardstock ~ approx. 3" x 1-1/2"
Inside Layer ~ Basic White Cardstock ~ 4" x 5-1/4"
Mint Macaron scraps for the word 'Coffee' and the coffee cup (inside)

  • Stamp the coffee cup on the front of the card using Cinnamon Cider ink. 
  • Use Versamark to stamp the little asterisk (*) randomly in the empty spaces on the front of the card.  Cover with Gold Embossing Powder, tap off the excess then set with the Heat Tool. 
  • On Layer 3, stamp the sentiment with Cinnamon Cider ink.  
  • On a Mint Macaron scrap, stamp the coffee cup using Cinnamon Cider ink. 
  • Use the Painted Labels Dies to cut out a Gold label and to cut around the sentiment.  
  • Then, cut out the word 'coffee' and the stamped coffee cup using Love You More Than Dies. 
  • Use Liquid Glue to add 'coffee' to the smaller label. 
  • Determine where you are going to place the Gold label, but don't adhere it yet.  Place two Glue Dots where they will be covered by the Gold Label.  Then, wrap the the Vanilla Baker's Twine around the front of the card three times, securing the ends with the two Glue Dots. 
  • Use Stampin' Dimensionals to attach the Gold Label over the twine. 
  • Stamp the smaller label on the Gold Label with Stampin' Dimensionals. 

For the inside, stamp either 'because adulting is hard' or 'and be awesome' using Cinnamon Cider ink on the Basic White Cardstock. 
Adhere the Basic White CS to the inside of the card, then add the coffee cup in the corner. 


I hope you enjoyed this card!  

Please contact me if you have any questions.  

If you live in the USA and don't have a Demonstrator I would love to send you our catalogs, or, even better, have you Join my team!  

You can also click the link at the top of my blog to sign up for my newsletter.  

Of course, if you just want to shop, you can click any of the product links at the bottom of this post, or SHOP button across the top of my blog, or the host code on the right side of this page.  

I would L♥VE to be your Stampin' Up! Demonstrator!

Click on the picture below to watch my YouTube Video showing you how to make this card.


Happy Stamping! 

PRODUCT LIST
(Please use the current Host Code, found in the top right corner of my blog, on orders under $150.  Thank you!)