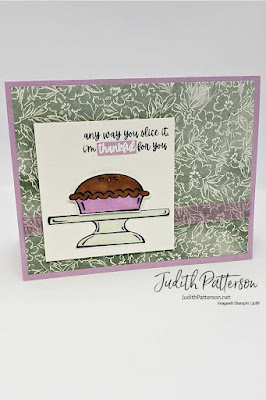
Hey stampers! Today's card might should have been posted last Thursday instead of today, since it was Thanksgiving! I just realized how perfect that would have been as I was editing the pictures today. Oh well. We should be thankful all the time, not just at Thanksgiving.
For some reason, I tend to grab pretty much the same colors when I used this set. I wonder if there's going to be a different set I use these colors with, since this Sweets & Treats stamp set will be retiring at the end of the month. If it is one you have had your eye on, don't miss your chance to purchase it. I have sure been enjoying it the last few months!
MEASUREMENTS
Card Base ~ Fresh Freesia Cardstock ~ 8-1/2" x 5-1/2", score at 4-1/4"
Layer 1 ~ Hand-Penned Designer Series Paper ~ 4" x 5-1/4"
Layer 2 ~ Basic White Cardstock ~ 3" x 3"
Scraps of Basic White Cardstock
Small Scrap of Fresh Freesia Cardstock
Inside Layer ~ Basic White Cardstock ~ 5-1/4" x 4"
- Use the Dark Fresh Freesia Stampin' Blend to color a 5-3/4" piece of White Glittered Organdy Ribbon, set aside.
- Stamp the pie and cake stand with Tuxedo Black Memento Ink on scraps of Basic White Cardstock.
- Use Stampin' Blends to color the stamped images. Then fussy cut around them with Paper Snips.
- Stamp the sentiment at the top of Layer 3 with Tuxedo Black Memento Ink.
- On the scrap of Fresh Freesia CS, use Versamark to stamp 'thankful'. Heat Emboss 'thankful' with White Embossing Powder. Then, cut around the 'thankful' and glue it over the same word in the stamped sentiment on Layer 2.
- Place the ribbon over Layer 1, securing each end behind the DSP with a Glue Dot.
- Adhere Layer 1 to the Card Base.
- Use Stampin' Dimensionals to attach Layer 2 to Layer, as shown.
- Glue the cake stand to Layer 2. Place the pie on the cake stand with Stampin' Dimensionals.
For the inside layer I just stamped a heart in the upper right corner with Fresh Freesia ink. Is there a sentiment you would like to add to the inside?
Adhere the inside layer to the inside of your card.
I hope this card inspires you to create something today!
Happy Stamping!
The July-December 2021 Mini Catalog will be retiring soon! It's always bittersweet to see a classic Stampin' Up! catalog take a trip to retirement. But, I'm looking forward to all the amazing new products on their way - and hope you are, too!
Stock up on your favorite products before they're gone for good! Save up to 50% on essential craft supplies. What are you waiting for? Start shopping! After all, this selection of Last Chance Products is only available while supplies last.
I went through the catalog during my Facebook Live December 1st.
Watch the replay if you would like all the details about what is retiring/staying/returning.
Or, you can download the Last Chance List here.
PRODUCT LIST
Please use Host Code 9TF2TPFV when placing orders under $150 during the month of December 2021.


