Friday, December 31, 2021

Stampin' Up! Dragonfly Garden ~ Card from the Catalog p. 22


Happy Friday!  Can you believe tomorrow is January 1, 2022!?  Where has this year gone?  

Today's 'Card from the Catalog' can be found on p. 22 of the 2021-2022 Annual Catalog.  It features the Dragonfly Garden Bundle and is perfect for the casual stamper.  I didn't make many changes to this one.  The biggest change was that I used a Light Cherry Cobbler Stampin' Blend to color Rhinestone Basic Jewels instead of just using the Artristry Blooms Adhesive-Backed Sequins used in the catalog.  I also positioned the dragonfly, sentiment and jewels just slightly different.  


MEASUREMENTS
Thick Basic White Cardstock ~ 8-1/2" x 5-1/2", score at 4-1/4"
Pattern Party Host Designer Series Paper ~ 5-1/2" x 4-1/4"
Petal Pink Cardstock ~ 3-1/2" x 4-1/2"
Just Jade Cardstock ~ 1-1/2" x 1"
Scrap of Basic White Cardstock
Scrap of Vellum Cardstock 


I hope you enjoyed this card from the catalog.  Let me know if you have any questions, or if there is a card from one of Stampin' Up!'s current catalogs that you would like to see made on my Friday YouTube Video. 

Here's the video:


Happy Stamping!

PRODUCT LIST
Please use the current Host Code when shopping (it can be found in the top right corner of my blog)


Thursday, December 30, 2021

Paper Pumpkin December 2021 - Lots of Pun ~ Alternative Project


Today's Facebook Live was all about Paper Pumpkin.  This month's kit is pretty punny and perfect for creating notecards with a matching mini paper pumpkin box.  In the video I showed you how to create your own patterned paper with the stamps and 5 alternate notecards.  The video and product list are at the bottom of this post. 

MEASUREMENTS
Note Card ~ 3-1/2" x 5"
Old Olive Cardstock ~ 3-1/4" x 4-3/4"
Basic White Cardstock ~ 3" x 4-1/2"
Scraps of Basic White Cardstock & Old Olive Cardstock 

(Follow the video for instructions)


January's Paper Pumpkin Kit is not only perfect for Valentine's Day, but also for anniversaries, weddings, honeymoons, birthday and more!  It includes an exclusive stamp set, a Gray Granite Stampin' Spot and enough supplies to create 10 cards with coordinating envelopes.

Beginning January 25th, an add on for this kit will be available that includes 20 mini treat boxes and 20 mini heart tags.  This add-on will only be available to Paper Pumpkin Subscribers. 

All of my Paper Pumpkin Subscribers are invited to a FREE Chat & Craft Zoom Event where we put together our kits and visit.  (Email invitations go out 48 hours before the event)  The next event will be February 5th at 10am CT.   Want to join us?  Subscribe here, making sure I'm your selected demonstrator. 


Thanks for reading this far!  I hope you enjoy this project.  Here's the video:


Happy Stamping!


PRODUCT LIST


Wednesday, December 29, 2021

Stampin' Up! Honeybee Home ~ Sneak Peek!


Hey there!  Welcome to my blog.  Have you seen Stampin' Up!'s new Honeybee Home stamp set yet?  This card is just a sample of the greatness that this set includes!  It is a floral set that includes three bees and some fantastic sentiments.  Plus, there's a coordinating die set and beautiful designer series paper.  

This sweet sketch from Atlantic Hearts Sketch Challenge inspired today's card.  Check out their blog here, so you can play along with this week's challenge. 


MEASUREMENTS
Card Base ~ Basic Gray Cardstock ~ 8-1/2 x 5-1/2", score at 4-1/4"
Layer 1 ~ Coastal Cabana Cardstock ~ 4" x 5-1/4"
Layer 2 ~ Heart & Home Designer Series Paper ~ 1-3/4" x 3-3/4" (*2) and 1-1/4" x 3-3/4"
Layer 3 ~ Basic Gray Cardstock ~ 1-3/4" x 3-1/4"
Layer 4 ~ Basic White Cardstock ~ 1-1/2" x 3"
Scraps of Basic White Cardstock
Inside Layer ~ Basic White Cardstock ~ 4" x 5-1/4"

  • Stamp the flowers  and the bee with Tuxedo Black Memento Ink on scraps of Basic white Cardstock.  I used the Stamparatus so I could stamp each image (and sentiment) two to three times to get a nice, dark image. 
  • Use Blender Pens with ink pads to color the bee and flowers. 
  • Stamp the sentiment on the smallest piece of DSP, almost all the way to the right edge. 
  • Assemble Layers 1-4 on the Card Base with Liquid Glue, as shown. If needed, trim the bottom of the flower stem along the edge of Layer 4 with Paper Snips. 
  • Attach the bee with Stampin' Dimensionals. 

Stamp the bee in the center of the Inside Layer with Mango Melody Ink.  Then, adhere the Inside Layer to the inside of the card. 


I hope this card inspires you to get creative.  Thanks for visiting my blog!
Let me know if you live in the USA, don't have a demonstrator and would like a copy of the new catalog.  I will be glad to send you one!

Happy Stamping!


The July-December 2021 Mini Catalog will be retiring soon!  It's always bittersweet to see a classic Stampin' Up! catalog take a trip to retirement.  But, I'm looking forward to all the amazing new products on their way - and hope you are, too!

Stock up on your favorite products before they're gone for good!  Save up to 50% on essential craft supplies.  What are you waiting for?  Start shopping!  After all, this selection of Last Chance Products is only available while supplies last. 

Or, you can download the Last Chance List here
I'm trying to keep this Going, Going, GONE! List Updated here.

SHOPPING LIST
Please use Host Code 9TF2TPFV when placing orders under $150 during the month of December 2021.

The new products are not available until January 4th.  So they are not included in this clickable Shopping List. 


Tuesday, December 28, 2021

Stampin' Up!® Shaded Summer


This card uses three Stampin' Up! products that I think make very elegant paper crafts.  Shaded Summer is the perfect stamp set for silhouette flowers and beautiful sentiments.  In Good Taste Designer Series Paper is fun to cut apart and piece together, plus, it's great for stamping on. I love that it looks like some of the pieces are popped up with Dimensionals, when in fact they are all adhered with Liquid Glue.  Timeworn Type 3D Embossing Folder always adds a touch of elegance to pretty much any project. 

MEASUREMENTS
Card Base ~ Gray Granite Cardstock ~ 8-1/2" x 5-1/2", score at 4-1/4"
Layer 1 ~ Basic Black Cardstock ~ 4-1/8" x 5-3/8"
Layer 2 ~ Basic White Cardstock ~ 4" x 5-1/4"
Layer 3 ~ In Good Taste Designer Series Paper ~ 3-3/4" x 4-3/4"
Inside Layer ~ Basic White Cardstock ~ 4" x 5-1/4"

  • Stamp the flowers on towards the left side of Layer 3 with Versamark.  Heat Emboss with Black Embossing Powder.
  • Cut the DSP along the lines of each wood slat.  Trim the ends so they are all varying lengths. 
  • Figure out where you are going to place each of the pieces, leaving a space for the sentiment.  In that space, go ahead and heat emboss the sentiment on Layer 2. 
  • Emboss Layer 2 with the Timeworn Type Embossing Folder.
  • Adhere each of the Layer 3 pieces to Layer 2 with Liquid Glue, leaving a small gap between each piece.
  • Attach Layer 2 to Layer 1 and Layer 1 to the Card Base with Liquid Glue. 
  • For this inside of this card, I decided to just attach the Basic White Inside Layer, with no additional stamping or decorations. 

I hope this card inspires you to create something beautiful.  If you decide to piece together a card using another sheet of In Good Taste DSP (or a different stamp set), I would love to see it!  You can tag me on Facebook, Instagram, or Pinterest.

Prefer to watch a video tutorial?  You can do that here!

Happy Stamping!


The July-December 2021 Mini Catalog will be retiring soon!  It's always bittersweet to see a classic Stampin' Up! catalog take a trip to retirement.  But, I'm looking forward to all the amazing new products on their way - and hope you are, too!

Stock up on your favorite products before they're gone for good!  Save up to 50% on essential craft supplies.  What are you waiting for?  Start shopping!  After all, this selection of Last Chance Products is only available while supplies last. 

Or, you can download the Last Chance List here
I'm trying to keep this Going, Going, GONE! List Updated here.

PRODUCT LIST
Please use Host Code 9TF2TPFV when placing orders under $150 during the month of December 2021.


Monday, December 27, 2021

Stampin' Up!® Happy Birthday Chick


Happy Monday!  Did you know that Stampin' Up!'s Hey Birthday Chick stamps & dies are still available?  I haven't seen much about them lately, and since these little chicks are among my favorite stamps, I thought it was time to create a new card with them!  I find coloring this crazy chicken with Stampin' Blends to be incredibly fun.  What off the wall color scheme would you use with this one? 


MEASUREMENTS
Card Base ~ Granny Apple Green Cardstock ~ 8-1/2" x 11", score at 4-1/4"
Layer 1 ~ Pattern Party Designer Series Paper ~ 3/4" x 5-1/2"
Layer 2 ~ Basic White Cardstock ~ 3-1/4" x 5-1/2"
Layer 3 ~ Flirty Flamingo Cardstock ~ 1-1/4" x 2"

Inside Layer ~ Basic White Cardstock ~ 4" x 5-1/4"

  • Stamp the chicken with the cupcake in left-center of Layer 2 with Tuxedo Black Memento Ink.
  • Make a Post-It Note mask of the chick & cupcake with the coordinating die. Place it on the stamped chicken.
  • Create a background around the chicken with Blending Brushes, Granny Apple Green Ink and Pool Party Ink.
  • Remove the mask, and color the chicken & cupcake with Stampin' Blends. 
  • Place Layer 3 on a 1-1/4" x 2" piece of a Foam Adhesive Sheet.  Put the 'Happy Birthday' die on top of that and die cut it.  (I suggest running it through the Stampin' Cut & Emboss Machine a few times to make sure it cuts all the way through)
  • Adhere Layer 1 to the Card Base, about 1/4" from the bottom. 
  • Use Liquid Glue to attach Layer 2 to the Card Base, slightly layered over Layer 1. 
  • Place 'happy birthday' in the upper-right corner.
  • Add a few Holiday Rhinestones around the sentiment, as shown. 

Use Tuxedo Black Memento Ink to stamp the little chick and sentiment on the Inside Layer, as shown.  Mask the chick, then add a touch of Granny Apple Green around it.  After removing the mask, color the chick.  Then, adhere the Inside Layer to the inside of the card. 


I hope this card inspires you to create something fun.  These crazy chicks STILL make me smile every time I pull them off the shelf!  :)

Happy Stamping!


The July-December 2021 Mini Catalog will be retiring soon!  It's always bittersweet to see a classic Stampin' Up! catalog take a trip to retirement.  But, I'm looking forward to all the amazing new products on their way - and hope you are, too!

Stock up on your favorite products before they're gone for good!  Save up to 50% on essential craft supplies.  What are you waiting for?  Start shopping!  After all, this selection of Last Chance Products is only available while supplies last. 

Or, you can download the Last Chance List here
I'm trying to keep this Going, Going, GONE! List Updated here.

PRODUCT LIST
Please use Host Code 9TF2TPFV when placing orders under $150 during the month of December 2021.


Saturday, December 25, 2021

Stampin' Up! Happiest of Birthdays card


Hi and welcome!  Today's card features all five of the 2021-2023 In Colors.  It also uses the Stockings Dies, which is retiring January 3rd, or when supplies run out.  I love that this die set can be used for more than just Christmas cards.  Try Stampin' on Tuesday's Challenge 536 inspired this card. 


MEASUREMENTS
Card Base ~ Evening Evergreen Cardstock ~ 8-1/2" x 5-1/2", score at 4-1/4"
Large Scrap of Basic White Cardstock 
Scraps of 2021-2023 In Color Designer Series Paper

Inside Layer ~ Basic White Cardstock ~ 4" x 5-1/4"

  • Stamp the sentiment with Fresh Freesia Ink on the large scrap of Basic White Cardstock.  Use the largest die from Stockings Dies to cut it out. 
  • Die cut several gifts from 2021-2023 In Color DSP.  Then die cut several bows from scraps of Evening Evergreen and Fresh Freesia Cardstock. 
  • Use Liquid Glue to attach the bows to the gifts. 
  • Cut three 4" pieces of ribbon.  Fold one end in half, then cut off the tip at an angle to make a banner. 
  • Use Tear & Tape to attach the ribbon to the front of the card so that the banner ends are even.  (Cut off any of the excess ribbon hanging over the top of the card.)
  • Attach the sentiment piece to the front of the card with Stampin' Dimensionals. 
  • Adhere two of the gifts with Liquid Glue, then add the third with a Stampin' Dimensional.

Adhere the Inside Layer to the inside of the card.  Then, glue two of the gifts to the lower right corner, as shown.


The July-December 2021 Mini Catalog will be retiring soon!  It's always bittersweet to see a classic Stampin' Up! catalog take a trip to retirement.  But, I'm looking forward to all the amazing new products on their way - and hope you are, too!

Stock up on your favorite products before they're gone for good!  Save up to 50% on essential craft supplies.  What are you waiting for?  Start shopping!  After all, this selection of Last Chance Products is only available while supplies last. 

Or, you can download the Last Chance List here
I'm trying to keep this Going, Going, GONE! List Updated here.

PRODUCT LIST
Please use Host Code 9TF2TPFV when placing orders under $150 during the month of December 2021.

Friday, December 24, 2021

Paper Pumpkin Lots of Pun ~ Alternate Card


Hi there!  Welcome to my blog.  Instead of sharing a card from the catalog, today I'm sharing a card using the stamps from December's Paper Pumpkin Kit, Lots of Pun.  We love puns in our house, and this kit is full of some great ones!  

MEASUREMENTS
Card Base ~ Pool Party Cardstock ~ 8-1/2" x 5-1/2", score at 4-1/4"
Layer 1 ~ Basic White Cardstock ~ 4" x 5-1/4"
Scrap of Poppy Parade Cardstock and scraps of Basic White Cardstock
Inside Layer ~ Basic White Cardstock ~ 4" x 51/4"

  • Create the background with the Dark Pool Party Stampin' Blend. 
  • Stamp the banana four times with Daffodil Delight Ink on the scraps of Basic White Cardstock. 
  • Color the bananas with the Light Stampin' Blend and the stems with the Cinnamon Cider Stampin' Blends.  
  • Stamp the smiley face on one banana with Tuxedo Black Memento Ink.  
  • Fussy cut all the bananas.  Then, glue them together, as shown.  Make sure to keep the smiling banana on top. 
  • Stamp the dots with Poppy Parade ink, beginning where you want to put the bananas and going off the edge of Layer 1. 
  • Heat emboss the sentiment on the scrap of Poppy Parade cardstock with White Embossing Powder.  Trim around the sentiment with Paper Snips. 
  • Adhere Layer 1 to the card base.  Then, add the bananas.  
  • Use Mini Stampin' Dimensionals to attach the sentiment to the front of the card. 
  • If you still have a heart from your Paper Pumpkin kit, add one next to the bananas, as shown. 

On the Inside Layer, stamp the banana in the lower right color, and color to match the ones on the front of the card.  Stamp the word bubble and 'hi' with Tuxedo Black Memento ink.  Adhere this layer to the inside of your card. 


Thanks for visiting by blog!

Happy Stamping! 


You don't want to miss the next Paper Pumpkin Kit, which is available until January 10th.  This kit will include enough supplies to create 10 cards, 5 each of 2 designs and 10 coordinating envelopes.  The stamp set is an exclusive Two-Step photopolymer set - I can't wait to see it!  It will also include a Gray Granite Stampin' Spot.  Did I mention, the cards are heart-shaped?  So cool!  
Subscribe here

Prepaid Paper Pumpkin

PRODUCT LIST


Thursday, December 23, 2021

Stampin' Up!'s Take Your Pick Tool ~ Ink & Inspiration Blog Hop


Welcome to the Ink  Inspiration Blog Hop.  You are currently visiting Judith Patterson from the USA.  This is my first time hopping with this group and I'm very excited to be included!

This month's theme is to share about our favorite product.  At first, I wasn't sure what to blog about, since my first thought was that EVERTHING Stampin' Up! has is my favorite product!  lol  Really, I like it all. A lot.
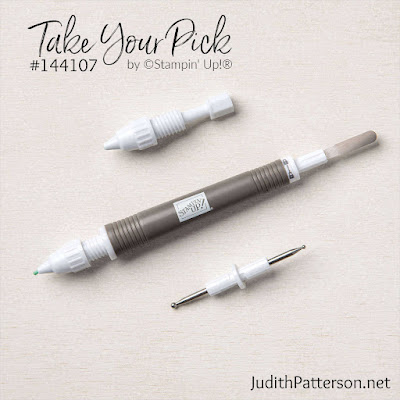
However, there is one tool that I use every time I stamp.  Okay, more than one tool.  But the one I chose to blog about is Stampin' Up!'s Take Your Pick Tool. I think this handy little device is often overlooked in the stamping world, but I sure don't want to go back to paper crafting without it. It is so versatile and helps with little things every time I create! 


The Take Your Pick Tool comes with three different ends, for a total of five tools.
I'll start with the tacky end, since it is the one I use most often.  This is end has a tacky putty that is perfect for picking up sequins, or any type of jewel, matte dot, or other small embellishment.  It's also great for picking up tiny pieces of cardstock.  Have you ever gotten a piece of lint or something small and unwanted on your project?  This end of the tool is perfect for getting those little things off.  Bonus: you can get refills this end, so you don't have to worry about running out of putty.

The other end that I use often is actually not pictured.  On the other side of the flat piece shown above, there is a pointed end.  I use this end for picking up Glue Dots or Stampin' Dimensionals and placing them in the perfect position on my card.  (It's also great for taking the backing off of Dimensionals)  Another great use for this end is to punch holes through cardstock for ribbon, twine, or brads.  (It's handy to have Stampin' Pierce Mat behind the cardstock when piercing.)  The final way I use this tip is to poke cardstock out of dies.

The flat end is great for slipping between two pieces of cardstock that have been attached together and you need to un-attach them.  I have to admit that I haven't used this end as often, but it's super handy when you need it. 

The final tip is a large and small stylus.  Which is great for all the things you need to use a stylus for, like scoring paper.  I admit, I don't use this one as much because I typically use the stylus in my Stampin' Scored Scoring Tool.  It is nice to have though!


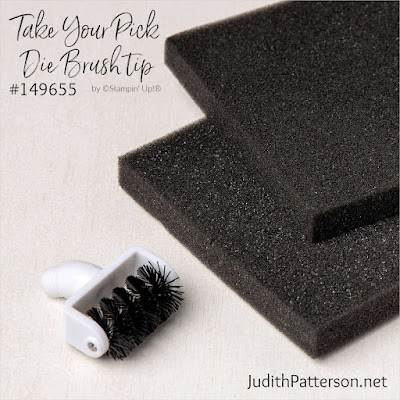
But wait, there's more!  :)  You can also purchase (separately) the Take Your Pick Die Brush Tip.  It comes with two foam pads and the brush head.  This piece is great for those intricate dies that have lots of pieces to poke it.  Just place your cardstock on one of the foam pads and roll the brush tip over it a few times.  Voila!  Those tiny little pieces will come right out.  To use, remove the tacky tip and place the brush in its place.  When finished, you can switch them back.

Thanks for reading my post!  Don't forget to visit the other blogs listed below to learn about everyone else's favorite Stampin' Up! products!

Happy Stamping! 

BLOG HOP LIST


PRODUCT LIST


Wednesday, December 22, 2021

Stampin' Up! Back on Your Feet - Clean & Simple


Hello! The card I'm sharing with you today is super quick and was inspired by this sketch at CAS Colors & Sketches.  This month you can use any of the 2021 challenges to enter their current challenge.  

I know three families whose week started off yucky, which is extra not fun this time of year, so I decided to make them each a card.  Instead of using ribbon or Designer Series Paper, I scored a few lines on the card with my Simply Scored Scoring Tool.  (You can see this better in the pictures below)


MEASUREMENTS
Card Base ~ Thick Basic White Cardstock ~ 8-1/2" x 5-1/2", score at 4-1/4"
Scrap of Basic White Cardstock 

  • Score four lines on the bottom of the card, starting at 1/2" and moving up.  With the card open, turn it over to start scoring, so that the raised lines are on the front of the card. 
  • Stamp the giraffe using Tuxedo Black Memento Ink on the scrap of cardstock.
  • Color the giraffe with Watercolor Pencils.  (I used Daffodil Delight & Pumpkin Pie for the body and Pumpkin Pie & Early Espresso for the spots)
  • Blend the colors with a Blender Pen. 
  • Fussy around cut the giraffe with Paper Snips. 
  • After getting an idea of where you are going to put your giraffe, stamp the sentiment with Tuxedo Black in. 
  • Attach the giraffe with Stampin' Dimensionals. 

I kept the inside simple, just stamping another sentiment. 


Stamping doesn't always have to take a long time or be super fancy.  I really enjoy simple stamping sometimes and it can have quite an impact.

Happy Stamping!


The July-December 2021 Mini Catalog will be retiring soon!  It's always bittersweet to see a classic Stampin' Up! catalog take a trip to retirement.  But, I'm looking forward to all the amazing new products on their way - and hope you are, too!

Stock up on your favorite products before they're gone for good!  Save up to 50% on essential craft supplies.  What are you waiting for?  Start shopping!  After all, this selection of Last Chance Products is only available while supplies last. 

Or, you can download the Last Chance List here
I'm trying to keep this Going, Going, GONE! List Updated daily here.

PRODUCT LIST
Please use Host Code 9TF2TPFV when placing orders under $150 during the month of December 2021


Tuesday, December 21, 2021

Stampin' Up! Colors & Contours - Easy Easel Card


Hello!  Welcome to my blog.  Today I'm sharing a quick and simple easel card.  I think this is the first easel card I have made, at least in a very long time.  I love the technique and that you can keep it simple, or get really fancy with it.  This one takes only 10-15 minutes to create and features Stampin' Up!'s Color & Contour stamp set, which is one of my go to stamp sets for quick and easy cards!

MEASUREMENTS
Card Base ~ Melon Mambo Cardstock ~ 11" x 4-1/4", score at 5-1/2" and at 2-3/4"
Layer 1 ~ Basic White Cardstock ~ 3-1/2" x 4-3/4"
Inside Layer ~ Basic White Cardstock ~ 4-1/4" x 5-1/2"
Scraps of Basic White Cardstock

  • Stamp the flower outline on Layer 1 using Old Olive ink.
  • Use Melon Mambo ink to stamp the splatter four times. 
  • Before stamping the inside of the flower with Melon Mambo ink, stamp off once on scrap paper. 
  • Cut out Layer 1 with the 2nd largest die from Scalloped Contours Dies. 
  • Heat Emboss the sentiment, using Versamark to stamp, then Black Embossing Powder.
  • Adhere the bottom half of Layer 1 to the bottom half of the Card Base, making sure to NOT get adhesive above the score line. 

Cut the Inside Layer with the largest die from Scalloped Contours Dies.  Heat Emboss the sentiment in the bottom center with Black Embossing Powder.  Stamp the flower bud outline with Old Olive Ink. Then stamp the inside with Melon Mambo, stamping off once first.  Glue the flower to another scrap or two of Basic White Cardstock.  Then, fussy cut around the flower.  Adhere the flower to the inside of your card, as shown. 


Thanks for visiting my blog!
Do you learn better by watching?  Here's the video tutorial for this card. 


Happy Stamping!


The July-December 2021 Mini Catalog will be retiring soon!  It's always bittersweet to see a classic Stampin' Up! catalog take a trip to retirement.  But, I'm looking forward to all the amazing new products on their way - and hope you are, too!

Stock up on your favorite products before they're gone for good!  Save up to 50% on essential craft supplies.  What are you waiting for?  Start shopping!  After all, this selection of Last Chance Products is only available while supplies last. 

Or, you can download the Last Chance List here
I'm trying to keep this Going, Going, GONE! List Updated daily here.

PRODUCT LIST
Please use Host Code 9TF2TPFV when placing orders under $150 during the month of December 2021


Monday, December 20, 2021

Stampin' Up! Timeless Tropical (small) Slimline Card


Sometimes you need a pretty birthday card in a hurry.  This color challenge from The Color Throwdown Blog inspired me to grab my Timeless Tropical stamps from the shelf and create this beautiful card.  It only took a few minutes to create this lovely card.  


MEASUREMENTS
Card Base ~ Mint Macaron Cardstock ~ 6-1/4" x 6-1/2", score at 3-1/4"
Layer 1 ~ Shimmery White Cardstock ~ 3" x 6"
Inside Layer ~ Basic White Cardstock ~ 3" x 6"
Scrap of Basic White Cardstock 

  • Apply a strip of Mint Macaron to Layer 1 with the wide Water Painter, as shown. 
  • Stamp the large flower with Flirty Flamingo on a large scrap of Basic White Cardstock 
  • Use Poppy Parade to stamp the sentiment on the card front, as shown. 
  • Adhere Layer 1 to the front of your card with Liquid Glue, or Stampin' Seal.
  • Attach the large flower to the front of the card with Stampin' Dimensionals. 

Stamp the smaller flower on the lower right corner of the Inside Layer, using Flirty Flamingo ink.  Adhere the Inside Layer to the inside of your card. 


And that's it!  This card comes together very quickly.  I hope you are inspired to create something lovely soon.  Thank you for stopping by my blog. 

Happy Stamping! 


The July-December 2021 Mini Catalog will be retiring soon!  It's always bittersweet to see a classic Stampin' Up! catalog take a trip to retirement.  But, I'm looking forward to all the amazing new products on their way - and hope you are, too!

Stock up on your favorite products before they're gone for good!  Save up to 50% on essential craft supplies.  What are you waiting for?  Start shopping!  After all, this selection of Last Chance Products is only available while supplies last. 

Or, you can download the Last Chance List here
I'm trying to keep this Going, Going, GONE! List Updated daily here.

PRODUCT LIST
Please use Host Code 9TF2TPFV when placing orders under $150 during the month of December 2021.