
Hello and welcome to my blog! I'm excited to be joining the Stamping Inkspirations Blog Hop today! This month we all participated in a sketch challenge. I can't wait to see what everyone else created for this challenge! (Links for the rest of the blogs in this Blog Hop are near the end of this post)
For my card, I chose to use the new Friendly Hello stamp set from Sale-a-bration! I surprised myself and decided not to use the coordinating Friendly Hello Designer Series Paper that comes as part of this FREE bundle! The DSP is beautiful, and it has some of my favorite colors, but I felt that not using it fit the sketch better. Keep watching my blog, I am sure to use it plenty in the upcoming weeks!
MEASUREMENTS
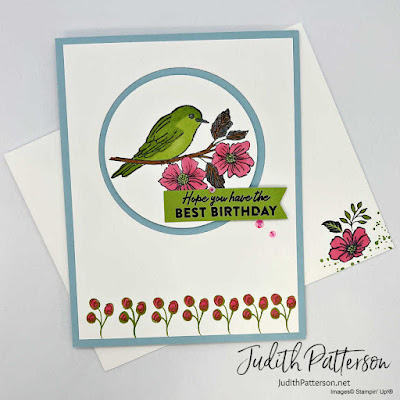
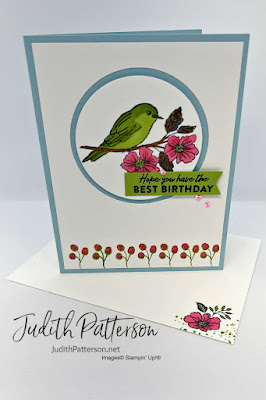
Card Base ~ Balmy Blue Cardstock ~ 8-1/2" x 5-1/2", score at 4-1/4"
Layer 1 ~ Basic White Cardstock ~ 4" x 5-1/4"
Layer 2 ~ Granny Apple Green Cardstock ~ 3/8" x 2-1/4"
Inside Layer ~ Basic White Cardstock ~ 4" x 5-1/4"
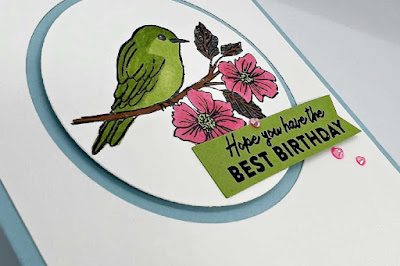
- Use the largest Layering Circles smooth circle die to cut out the center of Layer 1, as shown.
- Stamp the bird on the circle piece with Tuxedo Black Memento ink. Use Stampin' Blends to color the stamped image.
- Use the next to largest circle die to cut around the bird.
- Stamp the flowers along the bottom with Granny Apple Green ink. Then, color in the flowers with Stampin' Blends.
- Either stamp the sentiment on Layer 2 with Tuxedo Black Memento ink. OR, stamp with Versamark and Heat Emboss with Black Embossing Powder. (I chose to heat emboss)
- Trim the end into a banner shape with Paper Snips. (I like to make a light dot with a pencil in the center of the cardstock where I want the point to be. Then, I cut from each corner to that dot.)
- Attach Layer 1 to the card base with Liquid Glue or Stampin' Seal.
- Use Stampin' Dimensionals to attach the circle piece to the card base.
- Place a dab of Liquid Glue behind the 'hope' side of the sentiment piece and a Stampin' Dimensional on the other end. Put it on the card, as shown.
- Add a few 2021-2023 In Color Jewels to finish the front.
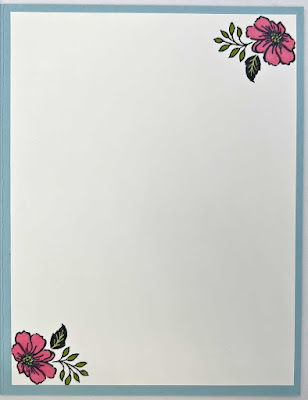
For the inside, stamp the smaller flower & leaves in opposite corners of the Inside Layer. Then, color with Stampin' Blends. Adhere this piece to the inside of the card. I also chose to stamp this image on the front of the envelope.
Thanks again for visiting my blog today. I hope you were inspired to create something great! Don't forget to check out the other blogs in this hop. I know I'm looking forward to doing just that this afternoon!
Happy Stamping!
Angie McKenzie ● Susan Simpson ● Donna Lester
Karen Egan ● Terry Hamilton ● Cheryl Hamilton
Leonie Stuart ● Gez Carpenter ● Aurélie Fabre
Tricia Butts ● Susan Webster ● Jill Chapman
Sue Allen ● Jan Musselman ● Chris Smith
Jo Blackman ● Lorraine Tierney ● Marieke Bart
Elaine de Montmorency ● Sharon Hashimoto Burkert
Danielle Kassing ● Karen Henderson ● Kirsty Patrick
Mo Rootes ● Judith Patterson ● Teri West
Rochelle Laird-Smith ● Annette Ball
PRODUCT LIST
Please use the current Host Code when shopping (it can be found in the top right corner of my blog)
January 2022 Host Code is QNB6WK39
Nicely done.
ReplyDeleteThank you Susan
DeleteCute card!
ReplyDeleteThanks Jill!
Deleteaww so cute
ReplyDeleteThank you Sue
DeleteBeautiful colors- love the way the circle is popped up!
ReplyDeleteThank you Cheryl! :)
DeleteVery cute card x
ReplyDeleteThanks Karen
DeleteLovely Card, Judith!
ReplyDeleteThanks Jan!
DeleteI love the stamping on the inside and on the envelope!
ReplyDeleteThank you! :)
DeleteLovely card Judith x
ReplyDeleteThank you! :)
DeleteLovely card Judith :-)
ReplyDeleteThank you
DeleteSimple and efficient !
ReplyDeleteThanks :)
DeletePretty card! Great interpretation of the sketch!
ReplyDeleteThank you Sharon! :)
DeleteSuch a lovely interpretation of the sketch, Judith! Love the coloring and details. Thanks for joining us on the blog hop! x
ReplyDeleteThanks Angie! ♥
DeleteBeautiful clean card and great interpretation x
ReplyDeleteThank you Jo!
Delete