
Thank you for joining us for our Stampin' Up!® Demonstrator Training Program Monthly Blog Hop! We are so happy that you could join us today for this blog hop for ideas and creative inspiration. We are a group of Stampin' Up!® Demonstrators from around the world that are taking part in training which is helping us build a successful Stampin' Up!® business and reach some goals we have set. We really appreciate your support.
You may be starting here or have come from another blog ~ either way you can find the link list at the bottom of this post so that you can see every blog post and idea today.

As part of our training, Kylie & Bruno challenge us each month to create thank you cards for our customers and team members. This is one of my favorite things about their training! Partly because I think it is incredibly important to say thank you, especially to our customers & team members. But also because I love being inspired by all the other creative demonstrators in this blog hop!
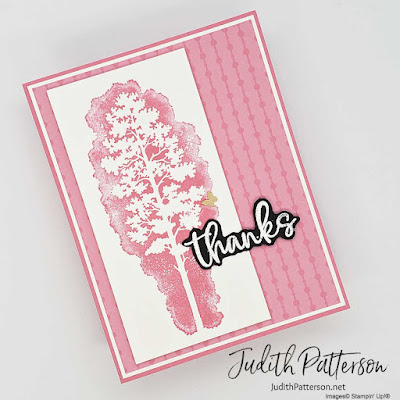
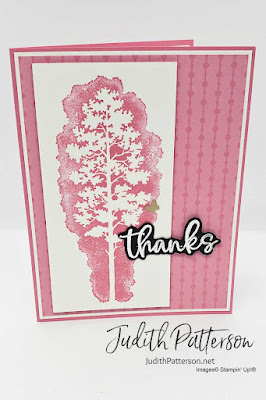
The thank you card I am sending to my amazing customers this month features a new stamp set from the upcoming 2022 January-June Mini Catalog. It is called Amazing Silhouettes and makes creating beautiful cards quick and easy! These images will work with practically any sentiment stamp (or die) set that Stampin' Up!® has to offer! The set I chose to accompany it for this card is Biggest Wish.
MEASUREMENTS
Card Base ~ Polished Pink Cardstock ~ 8-1/2" x 5-1/2", score at 4-1/4"
Layer 1 ~ Basic White Cardstock ~ 4-1/8" x 5-3/8"
Layer 2 ~ 2021-2023 In Color 6"x6" Designer Series Paper ~ 4" x 5-1/4"
Layer 3 ~ Basic White Cardstock ~ 2-1/2" x 5"
scrap of Basic Black Cardstock
Inside Layer ~ Basic White Cardstock ~ 4" x 5-1/4"

- Stamp the image using Polished Pink ink on Layer 3. (I used my Stamparatus so I could stamp twice)
- Use Versamark to stamp 'thanks' on the scrap of Basic Black. Heat emboss with White Embossing Powder.
- Fussy cut around 'thanks' with Paper Snips.
- Adhere Layer 1 to the Card Base, followed by Layer 2 on Layer 1.
- Attach Layer 3 to Layer 2 with Stampin' Dimensionals.
- Place a couple of Stampin' Dimensionals (I used Mini Dimensionals) behind the 'k' & 's' on 'thanks'. Apply a touch of Liquid Glue behind the 't-h-a'. Then, attach it to the front of the card, as shown.
- Add a Brushed Brass Butterfly above 'thanks'
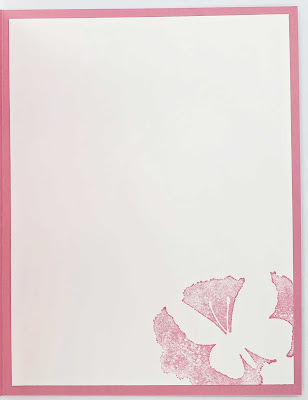
Stamp the butterfly image on the Inside Layer with Polished Pink ink. Then, adhere it to the inside of your card.
I hope you enjoyed this card! Don't forget to check out all the other cards from the amazing demonstrators in this blog hop.
If you would like to see the product list for this one, it is at the end of this post.
Happy Stamping!
BLOG HOP LIST
PRODUCT LIST
Please use Host Code 9TF2TPFV when placing orders under $150 during the month of December 2021.
These two items are only available to Demonstrators until January 4, 2022.
(Can't wait? Sign up today!)
Amazing Silhouettes Item # 157814
Brushed Brass Butterflies Item # 158136
Love it Judith - all that pretty pink.
ReplyDeleteThank you! I love this shade of pink! :)
DeleteGorgeous!
ReplyDeleteThanks! :)
DeleteSuch a pretty card!
ReplyDeleteChristina Barnes
Thank you Christina!
DeleteSo pretty. Love the colour. Thanks for sharing.
ReplyDeleteThank you! I'm glad you like it! :)
DeleteVery pretty card
ReplyDeleteThank you
DeleteGreat card! Love the use of the contrast of white embossing on black for greeting!
ReplyDeleteThank you! :)
DeleteLovely card Judith! Thank you for taking part in our Demonstrator Training Blog Hop this month.
ReplyDeleteThank you Kylie! :)
DeleteVery pretty card, Judith! I love the added touch of the stamped image on the inside.
ReplyDeleteThank you Mary Ann!
DeleteSuch a pretty card Judith, I love it x
ReplyDeleteThank you! :)
DeleteVery pretty card. Love the new idea for stamp backgrounds. Thanks for sharing.
ReplyDeletePretty in pink cards. Thanks for sharing
ReplyDeleteLovely card Judith! Love the thanks!
ReplyDeleteThanks Lesley! :)
Delete